You are using an out of date browser. It may not display this or other websites correctly.
You should upgrade or use an alternative browser.
You should upgrade or use an alternative browser.
Today I BOUGHT
- Thread starter Nugget
- Start date


Help Support Prospecting Australia:
This site may earn a commission from merchant affiliate
links, including eBay, Amazon, and others.
bit random Dave79 ...... X ....... Oops 
bit like you just walked into the women's lavatory
bit like you just walked into the women's lavatory
Ded Driver said:horses = :money: :money: :money: :money: :money: :money: :money: :money: :money: :money: :money:Smoky bandit said:100 mtr lay flat hose for filling up the horses tank from the bore...No rain here for months.......
New bike Jacket..
New tyres for the Jeep...
Dam it's been an expencive weekend.
None of this was planned :awful: :awful:
Time for a few :beer: s
how did you afford those beers? home brew?? :lol:
Beers should always be in the fridge, New Old Stock (NOS) = Previous purchases, but still within the Best Before Date......preferably. Could have been purchased before the said expensive weekend :Y: :Y: :beer: :beer:
as a kid, when my parents had the horse stud, we would soak barley in 44gal drums to add to the feed of the stabled nags. It was effectively 'malted' barley (some of it just germinated) ... If I knew then what I know now, there would have been a home brew hiding in the feed shed :lol: :lol: :lol: :lol: :beer: :beer:
- Joined
- Jan 2, 2017
- Messages
- 2,328
- Reaction score
- 3,016
Firstly, these inserts vary heaps in quality! The best inserts I've found where at power tools plus. 20c ea for a 6mm Insert.
Knurling is very important to gain grip from spinning after setting. Power tools plus brand had knurling on both horizontal and vertical faces.
The inserts you get in the kit....... honestly throw them out!
The amount of grip width varies in brands as well. The amount of mushroom (contact to parental metal) , tool kings/ Robbos range where terrible for this.
The pilot hole must be PRECISE!!!!
As the grip width/mushrooming of the inserts is fine. Keep it a tight fit!
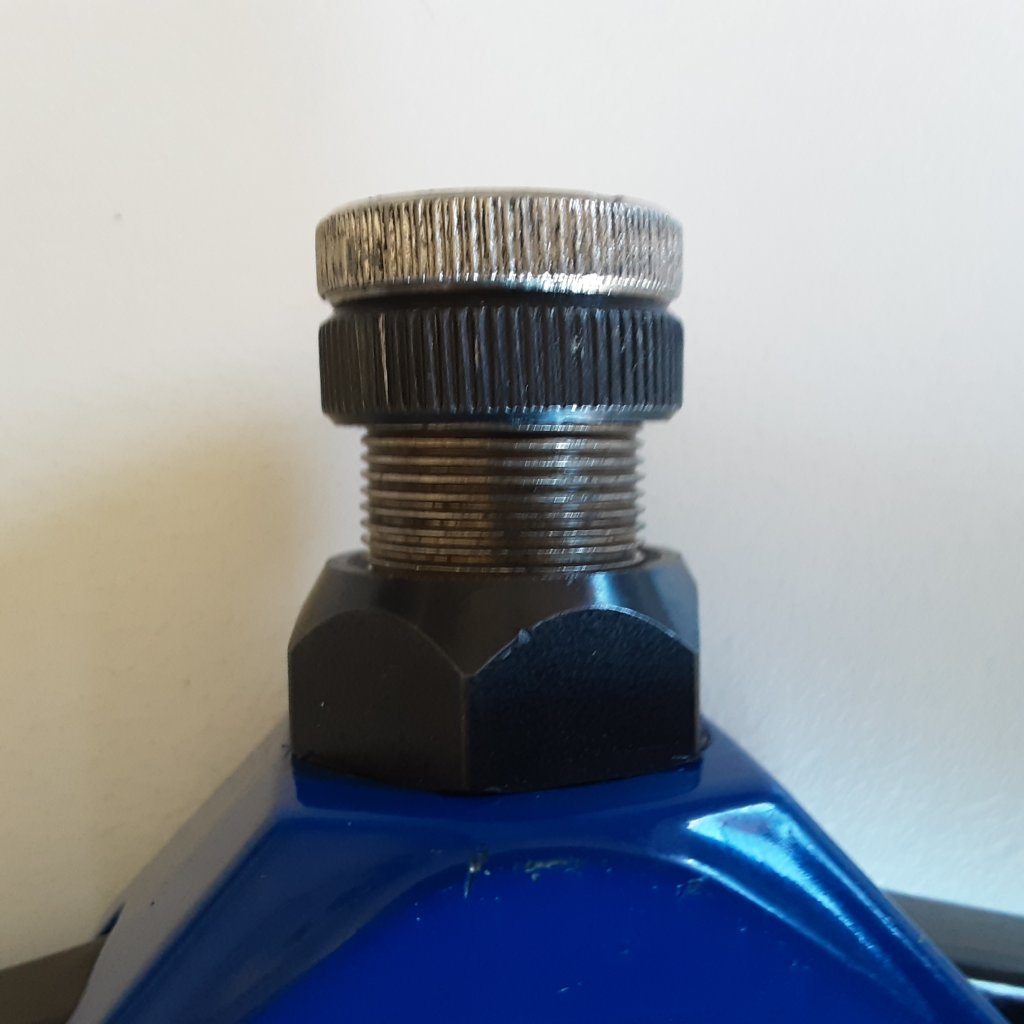
Apply a tiny bit of lube to the mandrel bolt (you get different sizes in the kit, 3,4, 5, 6mm etc)
No I instructions come with the kit!!! Grrrrr
Select the mandrel size you want to use.
Seperate the outer collar from the bolt drive piece.
Screw in the bolt driver, LEFT HAND THREAD! Then tighten with spanner supplied.
Now screw the outer collar on, LEFT HAND THREAD.
Open up the arms of the gun, screw the insert all the way.
Keep good flat contact whilst compressing.
It may or may not be done in one compression, you will notice a click and the arms as if the cams become relaxed. Very simular to a rivit gun.
Except the gun dose not detach after setting the insert.
If it dose not set in the first compression, you must turn the rear knob (between the arms) clockwise to deepen the bolt into the insert , thus removing the air gap created between the insert and tool.
Keep tool alignment whilst doing so.
Now what your MEANT to be able to do is open the arms and undo the bolt in the insert by turning the knob anti clockwise, grrrrrr.
I used about 40 m6 inserts, vice grips at first.......
Then I removed the knob, a very undersized grub screw.
And welded a spark plug socket onto it, that had a 3/8 drive.
Now I just use my cordless drill with a 3/8 driver on it to wind it out.
Once out, you MUST remove the swarf from the thread of the mandrel bolt.
Simply keep the drill attached and stick your thumb nail in the thread and wind it out.
It looks like a spring and very fine. But leaving it there will only accumulate and give you greif later.
Some of this swarf fine hair stuff will stay in the insert!
I highly recommend you put a 6mm tap in a cordless in simply zip it in and out to remove it.
Use a HS tap ((high speed) , straight in and out is fine. No need to work it back and forth. But set the clutch on the drill to mild in case there is an issue.
Knurling is very important to gain grip from spinning after setting. Power tools plus brand had knurling on both horizontal and vertical faces.
The inserts you get in the kit....... honestly throw them out!
The amount of grip width varies in brands as well. The amount of mushroom (contact to parental metal) , tool kings/ Robbos range where terrible for this.
The pilot hole must be PRECISE!!!!
As the grip width/mushrooming of the inserts is fine. Keep it a tight fit!
Apply a tiny bit of lube to the mandrel bolt (you get different sizes in the kit, 3,4, 5, 6mm etc)
No I instructions come with the kit!!! Grrrrr
Select the mandrel size you want to use.
Seperate the outer collar from the bolt drive piece.
Screw in the bolt driver, LEFT HAND THREAD! Then tighten with spanner supplied.
Now screw the outer collar on, LEFT HAND THREAD.
Open up the arms of the gun, screw the insert all the way.
Keep good flat contact whilst compressing.
It may or may not be done in one compression, you will notice a click and the arms as if the cams become relaxed. Very simular to a rivit gun.
Except the gun dose not detach after setting the insert.
If it dose not set in the first compression, you must turn the rear knob (between the arms) clockwise to deepen the bolt into the insert , thus removing the air gap created between the insert and tool.
Keep tool alignment whilst doing so.
Now what your MEANT to be able to do is open the arms and undo the bolt in the insert by turning the knob anti clockwise, grrrrrr.
I used about 40 m6 inserts, vice grips at first.......
Then I removed the knob, a very undersized grub screw.
And welded a spark plug socket onto it, that had a 3/8 drive.
Now I just use my cordless drill with a 3/8 driver on it to wind it out.
Once out, you MUST remove the swarf from the thread of the mandrel bolt.
Simply keep the drill attached and stick your thumb nail in the thread and wind it out.
It looks like a spring and very fine. But leaving it there will only accumulate and give you greif later.
Some of this swarf fine hair stuff will stay in the insert!
I highly recommend you put a 6mm tap in a cordless in simply zip it in and out to remove it.
Use a HS tap ((high speed) , straight in and out is fine. No need to work it back and forth. But set the clutch on the drill to mild in case there is an issue.
- Joined
- Jan 2, 2017
- Messages
- 2,328
- Reaction score
- 3,016

- Joined
- Jan 2, 2017
- Messages
- 2,328
- Reaction score
- 3,016
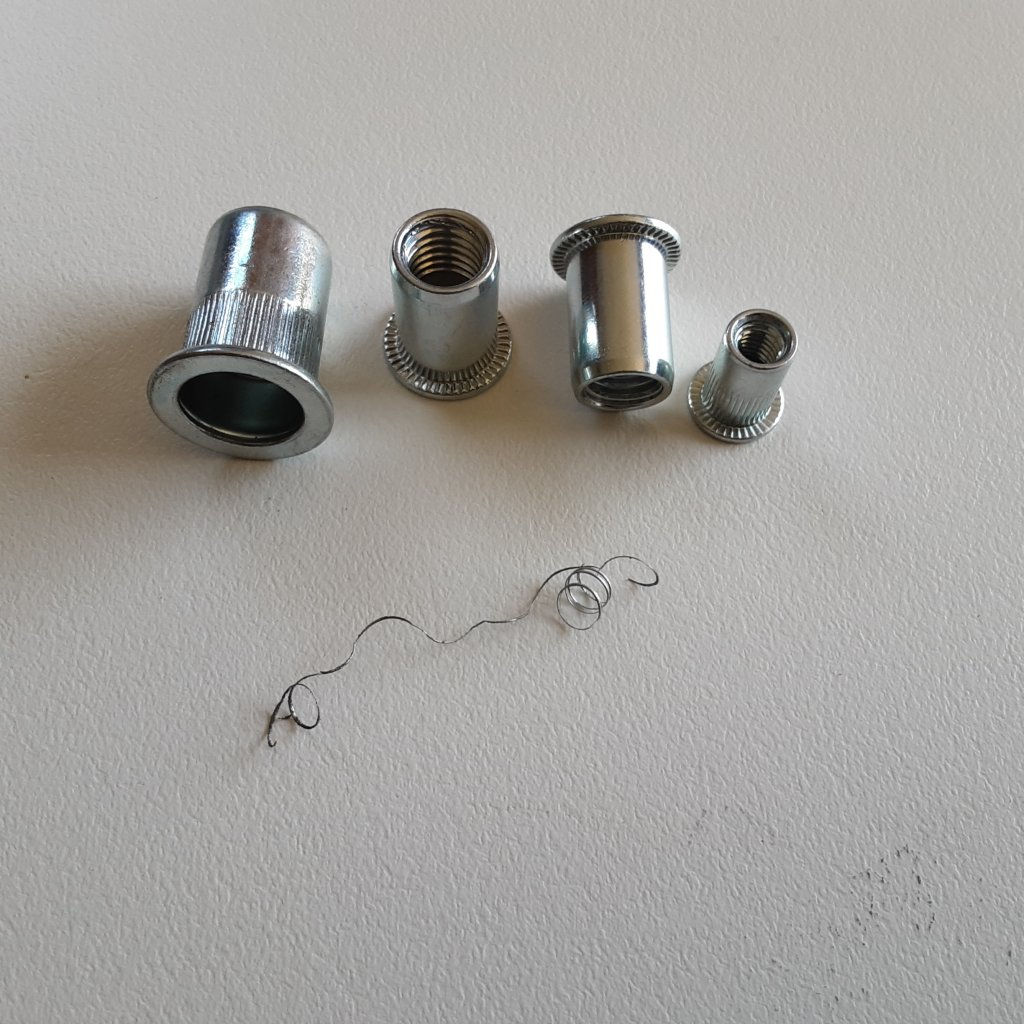
Here is a couple of different brands.
Notice how some have knurling spline along shafts.
And some brands have very small outer lap on the face, thus leaving little contact area.( not shown)
And the swarf I mentioned
- Joined
- Jan 2, 2017
- Messages
- 2,328
- Reaction score
- 3,016
Note!
If the tool dose not compress the insert on the first compression, the jaw action dose not take the slack up like a pop rivet gun. So when turning that knob clockwise (taking up the slack/air gap) ,
DO NOT OVER TIGHTEN!!!
As it is connected with a left hand thread.
Doing this will undo the mandrel bolt connection!
But due to lack of instructions........ And getting to know the tool a bit better.........
The outer collar has a reasonable length of thread.
And it is very possible that unscewing it ( clockwise, LEFT HAND THREAD remember) it may well be the correct way to take up the slack.
that's a great write-up Mudgee Hunter,
& with the fact you mentioned that the tool doesn't come with instructions, you have saved potential buyers (like me) from the 'trial & error' frustration that invariably comes with it.
cheers 'n beers for that
I will snap-shot that info & file for future use
erfect: :beer: :beer:
& with the fact you mentioned that the tool doesn't come with instructions, you have saved potential buyers (like me) from the 'trial & error' frustration that invariably comes with it.
cheers 'n beers for that
I will snap-shot that info & file for future use
erfect: :beer: :beer:- Joined
- Jan 2, 2017
- Messages
- 2,328
- Reaction score
- 3,016
Thanks! Well after another full day using this tool.....
Running the tap through the inserts a MUST!
Some inserts I had to use the proper tapping method, (forward/reverse)
This could be due to the insert not compressing exactly straight down, perhaps a slight lean to one side.
Another note is always de-bur the back side , to enable the mushrooming of the insert to get good contact.
With the burr left on, it may well loosen the insert when inserting the screw you are putting in .......... Then you may get stuck with a screw almost in, and can't undo it as the insert is spinning! Then you really are screwed if it jambs!
And not running the tap through it may well cause the same drama.
I tried the collar nut on the mandrel trick to take up the slack..... painfull. Just turn the rear knob a few turns.
As mentioned before, if you over turn the knob too much it will undo the drive bolt in the mandrel.
If this happens, simply turn it the opposite way to re-engage it.
I have seen three variants in size in this brand, smallest is shaped like a pop rivet gun. And dose 3 to 6mm. ( might struggle with 6mm?) Plus side of things is it can get into corners where the next to sizes up will not.
I bought the middle size unit, 3 to 10mm inserts. But because the arms start out in the expanded position, this inhibits getting into a corner.
About 200 to 250mm into a corner is your limit.
So test acces with the tool in the open armed position before you drill a hole.
Another note is these insert leave a collar that sits about 1.5mm above the sheet.
Inserts are available in alloy as well.
The 6mm inserts I used, need a 9mm hole.
Practice on scrap metal firstly.
6mm inserts I used where used on 1.6 and 3mm thick metal.
Blue lock tight might aid in the contact area of collar.
For the amount of Rivnuts that I set, I get by with a piece of flat steel and two spanners along with the corresponding high tensile bolt and nut to suit the thread that I am setting. Cheap, simple and do it yourself.
- Joined
- Jan 2, 2017
- Messages
- 2,328
- Reaction score
- 3,016
Well you would be still out there in the garage with the amount I'm setting.Whisp said:For the amount of Rivnuts that I set, I get by with a piece of flat steel and two spanners along with the corresponding high tensile bolt and nut to suit the thread that I am setting. Cheap, simple and do it yourself.
But hey if your only setting 2 or 3, yeah go the dodgy way!
You could probably throw out you pop rivet gun and pull hard with a pair of pliers
layful:- Joined
- Jan 2, 2017
- Messages
- 2,328
- Reaction score
- 3,016
Anyhow....... there seems to be a bit more nouse involved with the compression engineering than some can grasp.
The thread pitch on the insert and the mandrel seem to be calibrated to take in the crush affect.
Being 6mm x 1mm pitch finish size, AFTER compression.
But hey..... pan with a hub cap...... same deal if you only do it once and a while.....
You could always start a new thread "TODAY I DIDN'T BUY, BECAUSE IM A TIGHT ARSE"!
- Joined
- Mar 10, 2016
- Messages
- 7,948
- Reaction score
- 16,024
If your doing high volume MH is the gear you're using top notch or a cheaper sourced version of a quality design. It seems to be quite a bit of work and intervention in your process. I've never used them so don't know first hand but do know people who use them quite often and from what I gather WURTH are about as expensive as they come but don't seem to require a follow-up process.
- Joined
- Jan 2, 2017
- Messages
- 2,328
- Reaction score
- 3,016
Funny you mention that, all the YouTube vids from the companies I've seen suddenly skip the tool removal/disengagement!
And don't give you any info of pilot size holes or procedure !
Thus if it fails.... they say " we didn't tell you to do it that way"......
Total disclaimer!
No BMT (base metal thicknsss) tolerance gets mentioned anywhere ....
Happy to see facts of what Wurth have to offer!
Yet this would only apply to their brand of gun and inserts only.
100% Happy to see otherwise!
At the end of the day and you buy the kingchrome insert tool....
This is what you need to do in my opinion.
Not about "What I didn't buy" !
As "I DO NOT KNOW!
So I won't compare brands.
"Today I bought" ...
And this is my findings!
Opinion !
When an engineer drills a hole,
He does not select the right drill for the job.
He scribes a circle on the job then drills the hole
out to the circle.
Wings on a Jumbo jet are a prime example.
They are manufactured in two different places then
hand riveted on.
The holes both in size and placement must mach exactly.
Try doing that with a tape measure. {)
Picked up a canoe & motor nice and cheap.
 And a set of spotlights for the 4Be.

a bit of reading

Similar threads
- Replies
- 4
- Views
- 460