You are using an out of date browser. It may not display this or other websites correctly.
You should upgrade or use an alternative browser.
You should upgrade or use an alternative browser.
Show us your Isolation Projects
- Thread starter jethro
- Start date


Help Support Prospecting Australia:
This site may earn a commission from merchant affiliate
links, including eBay, Amazon, and others.
Noice job Muk. ")
condor22
Mike
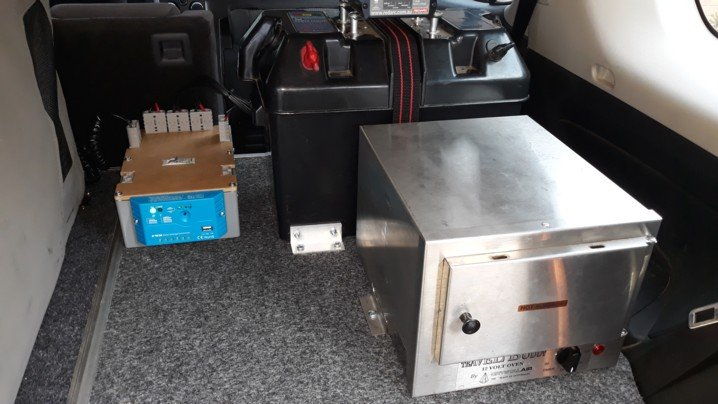
Continuing on with the redo of the 4x4 Aux electrics. The new baseboard is made, carpeted edged and fitted. Redone the battery box a little. I found with the battery box on top of the drawers there wasn't much room to lift 30 kg of battery out of it (getting weaker with age lol). I added a couple of angle brackets to the outside of the box, so that I can put the battery in the box on the ground, then just lift and slide it in to screw down.
Given that I went through wiring up my previous 4x4 as well as this one, I thought it would be good to come up with something plug n play. Also, not a fan of cig plugs, that Anderson plugs were the go. As the Redarc is on the battery cover all I've done there is tidy up the connections. So, Anderson plug outputs, power from the Aux Bat, hold the solar controller and its cctbrkr and power to n from the panel all self contained, here's what I've come up with..... next post
Given that I went through wiring up my previous 4x4 as well as this one, I thought it would be good to come up with something plug n play. Also, not a fan of cig plugs, that Anderson plugs were the go. As the Redarc is on the battery cover all I've done there is tidy up the connections. So, Anderson plug outputs, power from the Aux Bat, hold the solar controller and its cctbrkr and power to n from the panel all self contained, here's what I've come up with..... next post
condor22
Mike
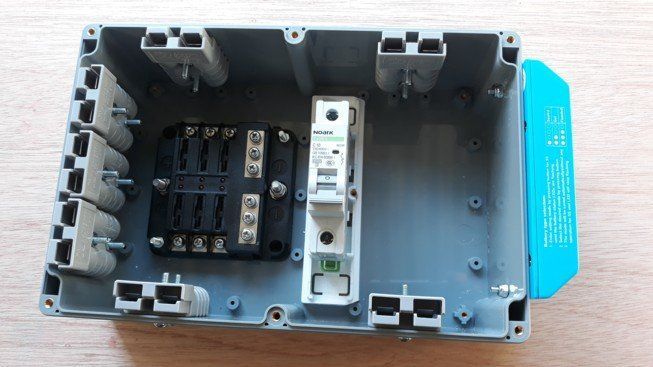
Got a jiffy box from Jaycar, but replaced the lid with 5mm thick poly sheet.
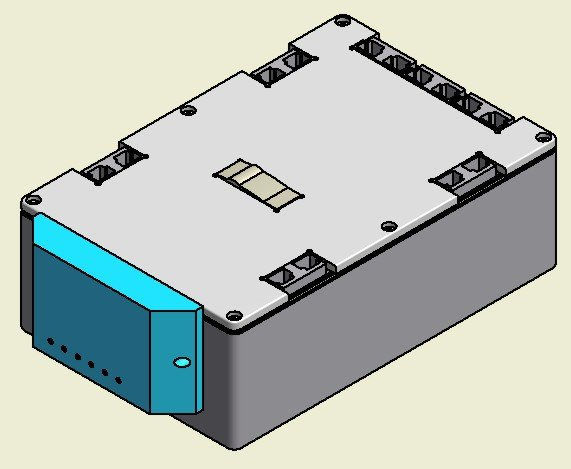
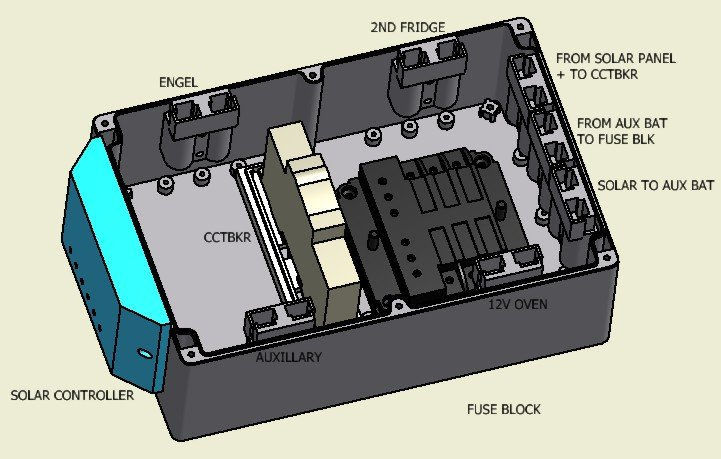
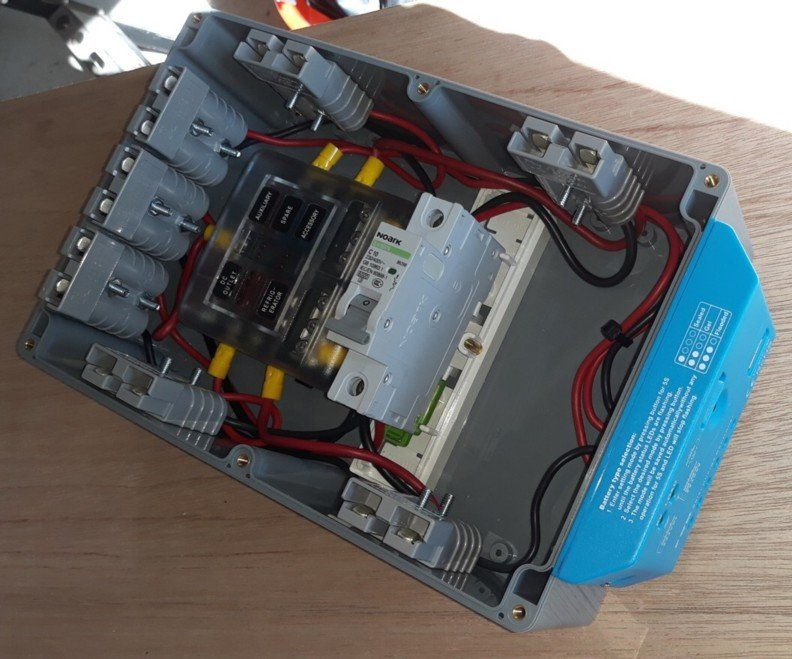
Inside the box, basic arrangement, the 2 plugs either side are outputs from the fuse block. The centre rear plug is 12 VDC in from the Aux battery. The plugs either side of it are Solar in (panel) and solar out Aux Bat). The circuit breaker and fuse block inside the box and the solar controller on the other end of the box.
I'll photograph the completed project later, (when it's stopped raining lol.

condor22
Mike
Assembled
Next job - Wiring
Next job - Wiring
condor22 said:Assembled
https://www.prospectingaustralia.com/forum/img/member-images/1932/1587881608_power_box.jpg
Next job - Wiring
One annoyance is that you will need to remove all those Andersens to wire them.
Rob P.
condor22 said:Assembled
https://www.prospectingaustralia.com/forum/img/member-images/1932/1587881608_power_box.jpg
Next job - Wiring
Interesting box of tricks,
do you think a volt meter might come in handy to monitor the Aux battery voltage? There's a lot going on with all those feeds. condor22
Mike
PabloP said:condor22 said:Assembled
https://www.prospectingaustralia.com/forum/img/member-images/1932/1587881608_power_box.jpg
Next job - Wiring
One annoyance is that you will need to remove all those Andersens to wire them.
Rob P.
True, but they are only fitted finger tight at the moment (trial fit). I'll fit all the plugs with wire and terminals first (with extra wire) then route them neatly before terminating at the fuse block, cctbkr and controller.
Re voltmeter, I have a BM PRO on the battery which gives me volts, amps in or out and Aux Bat SOC on my smart phone. However as a guide, I also have a plug in voltmeter I can use in a spare Anderson etc.
Of the 4 fused outlets, the Engel and Oven will be connected all the time. The Brass Monkey Fridge will only be fitted when I'm off prospecting and then usually only on the trip from S.A. to VIC. Once there it will go into the van and operate on van battery. The 4th connector is a spare that I can plug in a box I have from the Home of 12 V with cig sockets to charge detector batteries if needed and thus the little V meter.
I also have another Anderson outlet just inside the tailgate directly connected to the Aux Bat under the false floor which is used to power a water pump when I transfer H2O from jerries to van tank. I'm changing its fuse to heavier rating so that I could use that outlet for my air compressor to save going under the hood to the start bat. (engine running of course)


condor22
Mike
All wired up, cut the lid out next, but need a trip to Bunnings for some MDF
Nice and tidy the way it should be. Can you tell us what the anderson plugs all do?
condor22
Mike
Jaros said:Nice and tidy the way it should be. Can you tell us what the anderson plugs all do?
Refer post #84 Jaros, but
The end opposite the Solar Controller - LH - Solar panel in, RH - Solar to Aux Battery, Centre - From Aux Battery to power the fuse block.
There are 2 plugs each side powered by the fuse block (total 4) 1 - Engel Fridge, 2 - Brass Monkey Fridge (when in car), 3 - Travel Buddy oven. All of these are 10 A fused. The 4th is a spare Aux output, I have a small box with 3 cig sockets that can plug in here, which can charge my GPX, SDC batteries and wireless etc @ 15 A fuse.
I've kept inputs and outputs to the Aux battery separate to avoid directly sending charge current to any device, rather thru the battery. The Redarc BCDC is still fitted to the top of the battery box and is also Anderson in/out.
Battery terminals (+ & -) will be - From BCDC1220, Solar from the new box, Power to the box fuse block and the additional Anderson near the tailgate. So a total of 4 wires, each fused appropriately.
At some time in the future should a new vehicle be on the horizon, The only wiring I'll need to do is run a power cable from start battery and a cable from solar. The rest is all plug n play and easily removed from current to new vehicle.
As things stand I'll need to win the lottery or be the beneficiary of a wealthy relo for that to occur, lolol.
Very well thought out condor-looks great. Thanks for answering my query.
Jaros
Jaros
condor22
Mike
That's this project done n dusted - Power box fully wired and installed and working well. Everything I now plug into the primary auxiliary battery connectors are Anderson plugs. Pic shows Engel LH rear and Travel Buddy RH rear. LH front is fused for the Brass Monkey 15 lt and the RH front is a 15 A for other accessories as required. In the zoom out pic there is another Anderson at the lower left of the pic. It's currently fused to 30 A, but I want to up that so I can plug in my air comp.
BM Fridge fits between the Engel and oven, with the compressor at the rear away from the Engel comp.
The 3 plugs at the rear are LH - solar in, RH solar out, middle one is from Bat to box fuse block. CCTBRKR is where I can switch solar on/off.

I have a 3 x cig skt box which I need to Anderson plug, but it was bought with only 25 cm cable, so I'll extend that to about a metre long and it will plug into the spare socket on the box or in fact any Anderson outlet. Rain stopped play for today.....
Gonna need a couple of sleeps to dream up the next job lol.
BM Fridge fits between the Engel and oven, with the compressor at the rear away from the Engel comp.
The 3 plugs at the rear are LH - solar in, RH solar out, middle one is from Bat to box fuse block. CCTBRKR is where I can switch solar on/off.
I have a 3 x cig skt box which I need to Anderson plug, but it was bought with only 25 cm cable, so I'll extend that to about a metre long and it will plug into the spare socket on the box or in fact any Anderson outlet.
Rain stopped play for today.....Gonna need a couple of sleeps to dream up the next job lol.
Goldtarget
(AKA OldGT)
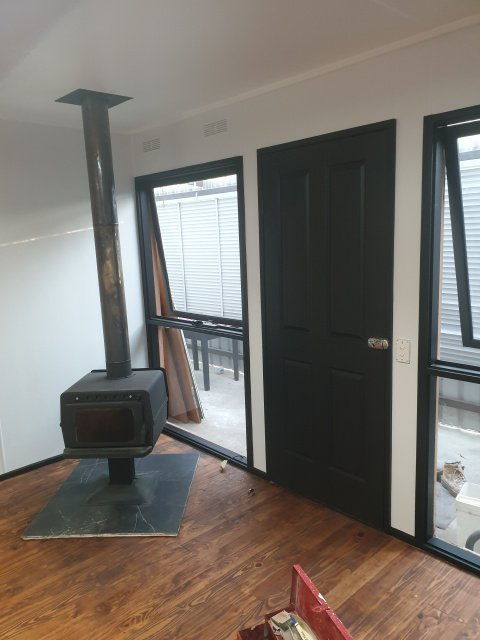
Getting there now.
Can anyone spot the mistake in this pic?
- Joined
- Mar 10, 2016
- Messages
- 7,947
- Reaction score
- 16,017
OldGT said:https://www.prospectingaustralia.co...ages/10069/1589524369_img_20200515_163115.jpg
Getting there now.
Can anyone spot the mistake in this pic?
Ah why is that fire place placed in door aperture :8 I'm sure you blokes have worked hard to get to where you are but the fire place is a complete disaster and waste of time and effort imo. All good though I'm absolutely certain the last tenant installed it and not you blokes all you need to is move/scrap it and patch the ceiling
:beer:OldGT said:Getting there now.
Can anyone spot the mistake in this pic?
Plus the stack should be shielded.
Similar threads
- Replies
- 8
- Views
- 3K
- Replies
- 17
- Views
- 4K
- Replies
- 96
- Views
- 18K
- Replies
- 8
- Views
- 5K
- Replies
- 55
- Views
- 16K