Lol yes that sickness sure comes on quick!!! Fever I think
You are using an out of date browser. It may not display this or other websites correctly.
You should upgrade or use an alternative browser.
You should upgrade or use an alternative browser.
Blower style Dry Blower build
- Thread starter MJB
- Start date


Help Support Prospecting Australia:
This site may earn a commission from merchant affiliate
links, including eBay, Amazon, and others.
Really nice build MJB love your work 
MJB
matt
Thanks fellas,
I will draw up some plans soon and post them on here. Along the way I have drawn up a few chook scratchings on bits of paper but nothing that anyone other than myself would understand...its all in my head sort of.
Once the unit is assembled I will take better pics of it for you with dimensions. The fan unit was the little tricky bit and hopefully it works well. I can make them again anytime, there is a little machining involved and welding.
Cheers,
Nice job well done hope you find plenty of gold with it .Possible to do a video of it when its running regards john
regards johnMJB
matt
G'day oldhand,
Yeah mate, a video will come of its maiden outing. Hopefully I can get out in a couple of weeks and test her out.
Cheers
Yeah mate, a video will come of its maiden outing. Hopefully I can get out in a couple of weeks and test her out.
Cheers
MJB
matt
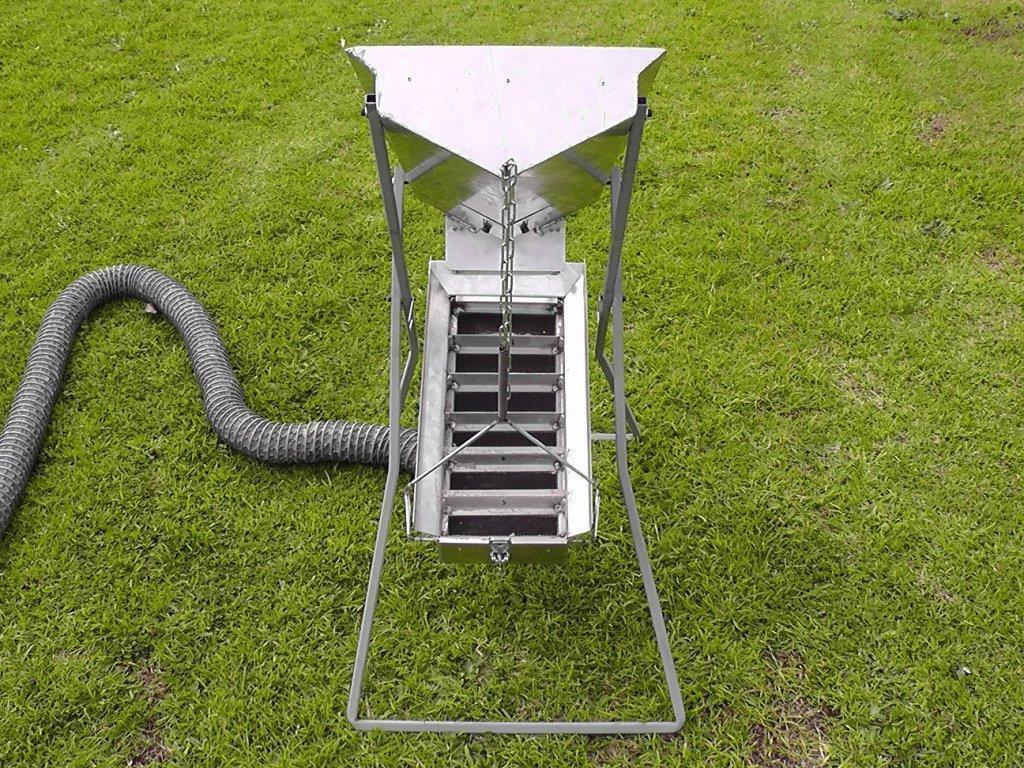
Progress report...
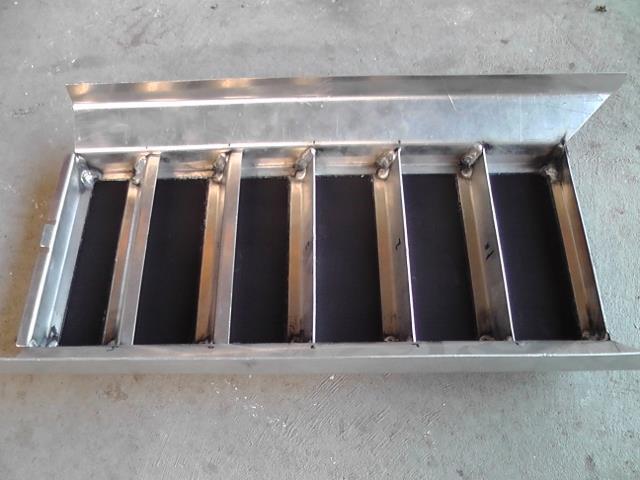
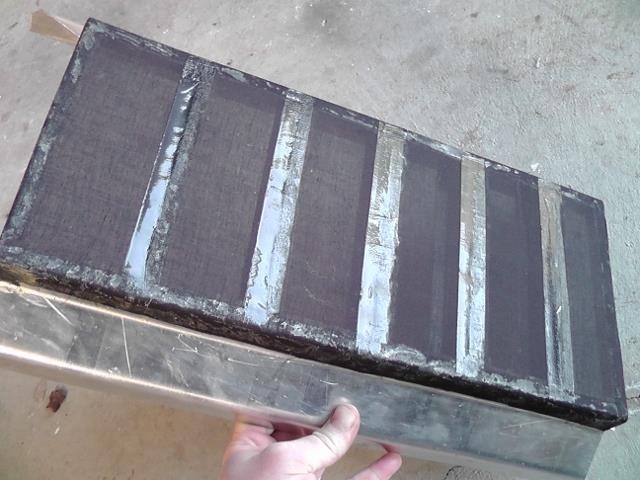
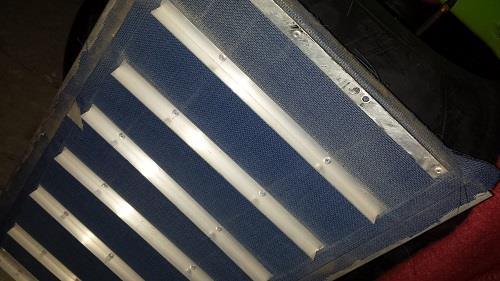
I received the fabric from WA and glued that on to the riffle tray with quick grip. After that I taped up the back so I could lay a thin smear of silicone under the riffles to make a dead air area just in front of them to allow the heavies to stay trapped there. I put some sealastrip down on the brackets that the riffle tray sits on to create a nice air tight seal and I am pretty stoked to say its a nice snug fit and no air gaps.
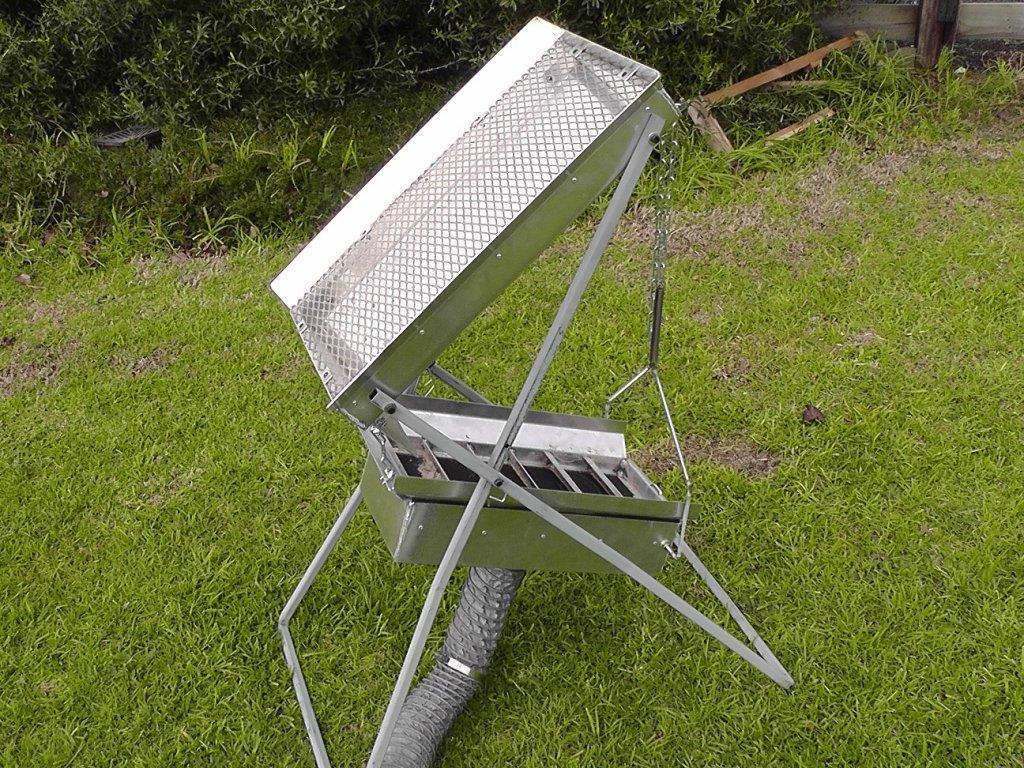
The only thing to do now is make some legs which I will be doing this week. I had to take the following photos while holding it up, camera in one hand, dry blower in the other.....I must have looked like a twit.
Riffle tray
Riffle tray bottom
The whole shebang minus legs
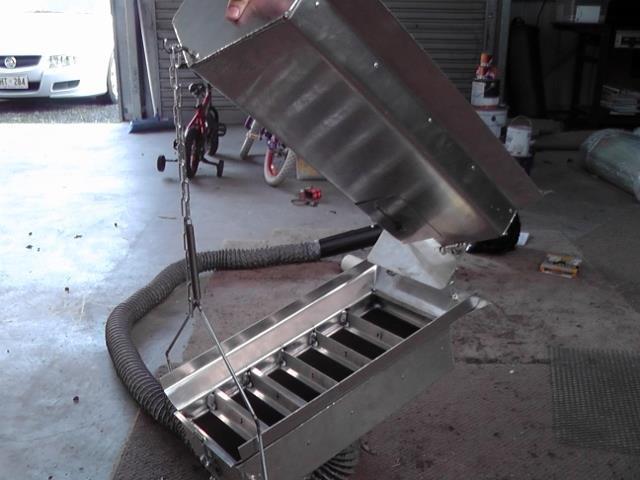
I started the motor up and happy to say my self built fan unit spun and works treat. It creates good vibrations but I am unsure if its enough to do the job. I reckon a bit of tweaking in the field is called for to get the optimum vibe to air flow ratio.
Im getting eager now to get it out but just need that elusive dry dirt.
Cheers
I received the fabric from WA and glued that on to the riffle tray with quick grip. After that I taped up the back so I could lay a thin smear of silicone under the riffles to make a dead air area just in front of them to allow the heavies to stay trapped there. I put some sealastrip down on the brackets that the riffle tray sits on to create a nice air tight seal and I am pretty stoked to say its a nice snug fit and no air gaps.
The only thing to do now is make some legs which I will be doing this week. I had to take the following photos while holding it up, camera in one hand, dry blower in the other.....I must have looked like a twit.
Riffle tray
Riffle tray bottom
The whole shebang minus legs
I started the motor up and happy to say my self built fan unit spun and works treat. It creates good vibrations but I am unsure if its enough to do the job. I reckon a bit of tweaking in the field is called for to get the optimum vibe to air flow ratio.
Im getting eager now to get it out but just need that elusive dry dirt.
Cheers
G
Guest
Looking awesome.
Looking real smyk mate
Goldtarget
(AKA OldGT)
Great job mate shout yourself a cold one and admire.
mate you'll forever be playing with that vibration setting. Best thing Ive found is that if the ground is a little moist slow it down a bit by forcing the balance outward which gives a better kick. otherwise bringing it back to a fine warble seems best for fine recovery. somewhere in between you'll be happy :0
MJB
matt
I know what you mean Goldigg@
I will take a few spare nuts out with me and if it needs more I less I can adjust to suit. I just wnat to see that dirt flowing out over the edge like its supposed to
Thanks GoldTarget, will definitley shout myself a few cold ones and even a few more once I know it works.
Cheers
I will take a few spare nuts out with me and if it needs more I less I can adjust to suit. I just wnat to see that dirt flowing out over the edge like its supposed to
Thanks GoldTarget, will definitley shout myself a few cold ones and even a few more once I know it works.
Cheers
that's the go mate, I ended up welding a nut onto a tyre nut I found some more mines to play in if you end up over here mate. check out the colour in this...
bit dicey but its kind of like an old lead rock overhead and underneath clay crevices and boulder packed tight good flaky gold there. way too far to run water think thats why it was abandoned. (either that or they didnt want to be crushed)but perfect dry dusty material to run through the drywasher.
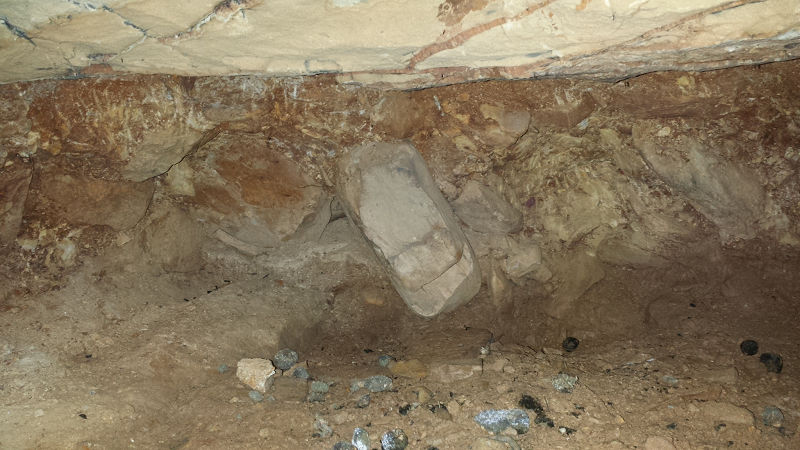
I found some more mines to play in if you end up over here mate. check out the colour in this...bit dicey but its kind of like an old lead rock overhead and underneath clay crevices and boulder packed tight good flaky gold there. way too far to run water think thats why it was abandoned. (either that or they didnt want to be crushed
)but perfect dry dusty material to run through the drywasher.
MJB
matt
That looks great but I gotta say that big lump of overhanging rock is a bit daunting. I would love to get in there with a hammer drill or something and get as much of that stuff as possible before the rock fell onmmy head :/
I hope they left for lack of water..
Cheers,
I hope they left for lack of water..
Cheers,
lol yeh me too I only classified one bucket to pan. will probably stick some timbers in there next i'm out that way.
I only classified one bucket to pan. will probably stick some timbers in there next i'm out that way.- Joined
- Apr 23, 2014
- Messages
- 73
- Reaction score
- 30
looks great mjb ,very tidy job
maybe wise to put some support under the riffles to hold up the cloth so not just relying on the silicone ? :/
cheers , flash
maybe wise to put some support under the riffles to hold up the cloth so not just relying on the silicone ? :/
cheers , flash
good call flashinthepan
I did exactly the same thing after nearly poking my finger through the riffles/material gap. best bit is once the holes are pre drilled you only have to heat the pop rivet up with a flame and poke it through the material and it stays nice and tight.
I did exactly the same thing after nearly poking my finger through the riffles/material gap. best bit is once the holes are pre drilled you only have to heat the pop rivet up with a flame and poke it through the material and it stays nice and tight.
MJB
matt
Thanks flash,
I was thinking about that. I remember the keen 140 was just glued to the bottom though. The riffles are flush with the sides of the riffle tray ( hard to explain I know ) and it is glued along its entire length with Kwik Grip. It seems like a pretty strong bond but they could be my famous last words.
I will look into something similar to Goldigg@'s pic, won't take much extra effort.
Cheers,
- Joined
- Apr 23, 2014
- Messages
- 73
- Reaction score
- 30
alls I did was cut a piece of about 1mm sheet to match the underside profile so to speak , and left a few mm in front of each riffle for the dead air space , attached with a few well place metal self tapping screws for easy removing ,and a touch more silicone ,ya gotta luv the stuff
MJB
matt
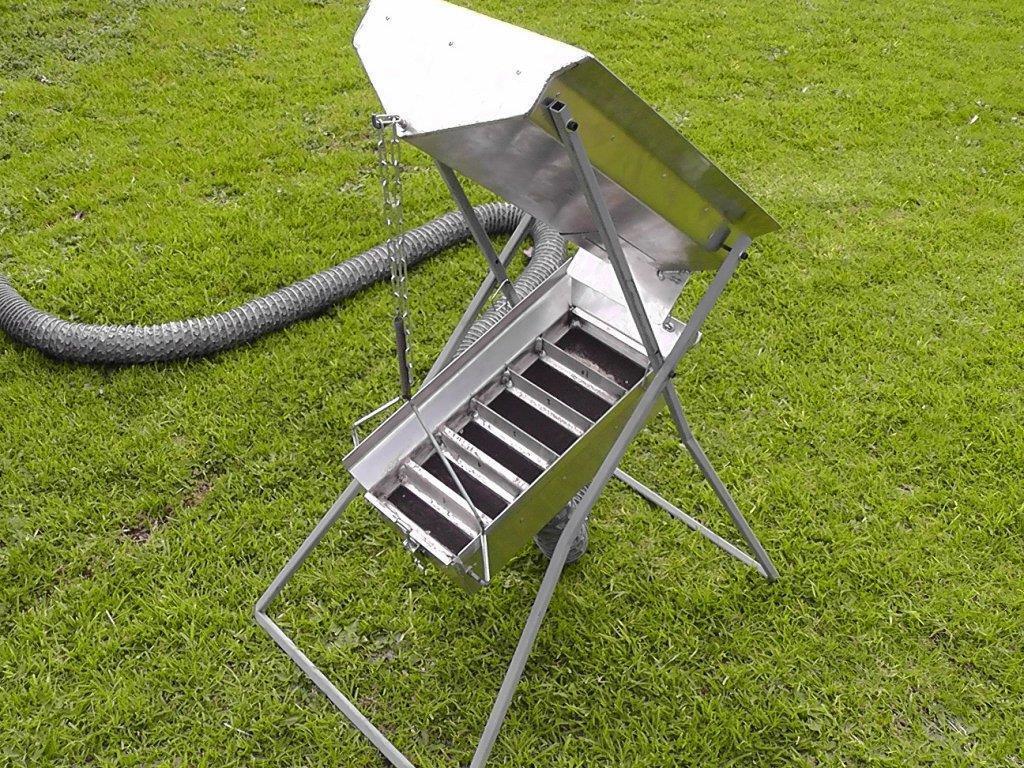
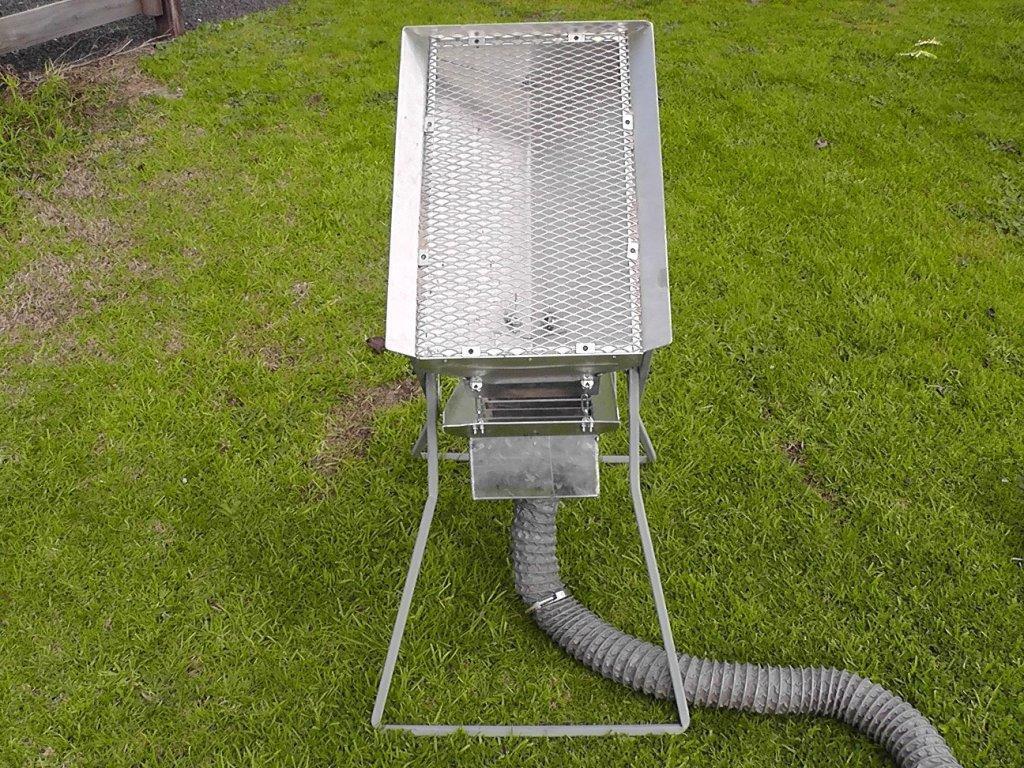
So the Dry Blower is all finished.....had a bit of spare time over the weekend to put in the final touches. I gave it a test run on wet sand out of the kids sand pit and it worked well, did everything it was supposed to so I gotta be happy with that.
The big test will be tomorrow when I take it out to Ararat for its maiden run in gold country. I have a few mullock heaps over there that are screaming at me to be put through the blower and the best part is I am fairly confident there is still some nice little chunks of yellow in them.
Will post some pics and results of the day tomorrow night and if I can figure out how to upload a video I will do that too.
Similar threads
- Locked
- Replies
- 0
- Views
- 709
- Replies
- 1
- Views
- 219