Conductivity switch fitting pics.

Prospecting Australia

Help Support Prospecting Australia:

This site may earn a commission from merchant affiliate links, including eBay, Amazon, and others.

ozziii

Paul
Joined
Jul 17, 2014
Messages
722
Reaction score
487
Location
Southern GT, VIC
First of all I would just like to say thankyou to GoldPick for making & sending me the conductivity switch for the SPP & giving me instructions on how to install & test it out. Very much appreciated mate.

Here are a few pics showing how I done it so other newbies like myself can get a good idea about how its done.

The switch


Inside the SPP box, don't pull it apart to far as it could damage wires.


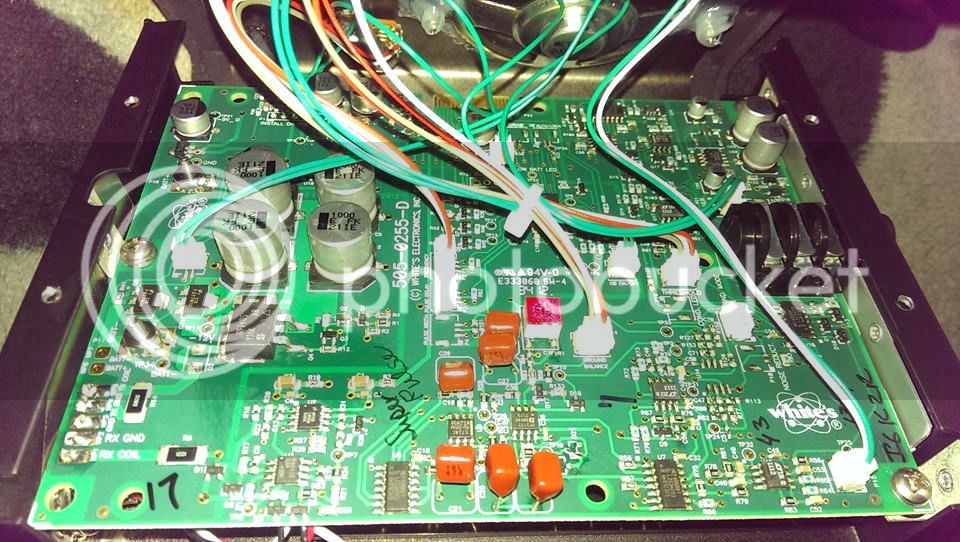
Whare the wires are connected too.


View showing low battery light removed to fit conductivity switch.


Switch fitted to low battery level light hole.


Switch plugged in to plug just under green wires on the left, near headphone jack.


Plug & switch installed & ready to close box up.


Back together with rubber boot & stick on labels fitted.
 
I wish I knew how to do this stuff.

The way the shaft is fastened to the box doesn't impress me. It really doesn't give me the option of a chest mounted set-up, or, getting one of those Anderson straight carbon-fibre shafts and fitting it.

Does the Oz Pro have the same fastening set-up?
 
SunriseBoy said:
I wish I knew how to do this stuff.

The way the shaft is fastened to the box doesn't impress me. It really doesn't give me the option of a chest mounted set-up, or, getting one of those Anderson straight carbon-fibre shafts and fitting it.

Does the Oz Pro have the same fastening set-up?

No mate the Pro comes with a belt clip underneath it and 4 Harness Rings fitted to it so you can Chest mount it,
 
SunriseBoy said:
I wish I knew how to do this stuff.

The way the shaft is fastened to the box doesn't impress me. It really doesn't give me the option of a chest mounted set-up, or, getting one of those Anderson straight carbon-fibre shafts and fitting it.

Does the Oz Pro have the same fastening set-up?

Hey Sunrise, I didn't think I would be able to do it myself but thought I would have a quick look inside just to check, once I seen how it looked I thought it would be easy, & it was, had good instructions from GP though.
 
SunriseBoy said:
I wish I knew how to do this stuff.

The way the shaft is fastened to the box doesn't impress me. It really doesn't give me the option of a chest mounted set-up, or, getting one of those Anderson straight carbon-fibre shafts and fitting it.

At the end of the day, the shaft is only fastened to the top of the control box by 2 pop rivets (and covered with a bucketload of silicone).
 
Nuggetbuster said:
SunriseBoy said:
I wish I knew how to do this stuff.

The way the shaft is fastened to the box doesn't impress me. It really doesn't give me the option of a chest mounted set-up, or, getting one of those Anderson straight carbon-fibre shafts and fitting it.

At the end of the day, the shaft is only fastened to the top of the control box by 2 pop rivets (and covered with a bucketload of silicone).

Yeah they certainly don't mind splashing the silicone around do they, plenty on there.
 
ozziii said:
Nuggetbuster said:
SunriseBoy said:
I wish I knew how to do this stuff.

The way the shaft is fastened to the box doesn't impress me. It really doesn't give me the option of a chest mounted set-up, or, getting one of those Anderson straight carbon-fibre shafts and fitting it.

At the end of the day, the shaft is only fastened to the top of the control box by 2 pop rivets (and covered with a bucketload of silicone).

Yeah they certainly don't mind splashing the silicone around do they, plenty on there.

The Silicone is only there to stop rain getting in and dripping on to the circuit board as are those long black seals on the edges of the metal work as ALL Whites Machines are tested for 168 hours in continuous Rain to ensure they do not fail in bad weather, And the Speaker is made of waterproof Mylar and it is sealed around the edge so if it gets full up it can not leak in side.

hope this helps,, John
 
So what yous are saying is that the spp due to the handle wont take a chest or hip mount ??
If so that is a real shite idea :mad:
 
YIPPEKAIAY said:
So what yous are saying is that the spp due to the handle wont take a chest or hip mount ??
If so that is a real shite idea :mad:

Well due to the light weight there is no need to chest mount it and normally it is only people who search in water require chest mounting a machine, But seeing as Whites already make Two waterproof machines I guess they decided they did not need another one,
Personally I would rather not use a machine that is Chest or Belt mounted as I prefer to get away from the machine whist I am Digging, Also Belt mounting machines is hard on the Coil lead Plugs and the socket, So that is another good reason to keep it shaft mounted. Chest mounting machines is all very well but when you consider that a PI will pick up your pinpointer even when it is turned off in your front pocket, So what do you think the effect will be chest mounting that huge box within reach of the Coil.
 
Ridge Runner said:
ozziii said:
Nuggetbuster said:
SunriseBoy said:
I wish I knew how to do this stuff.

The way the shaft is fastened to the box doesn't impress me. It really doesn't give me the option of a chest mounted set-up, or, getting one of those Anderson straight carbon-fibre shafts and fitting it.

At the end of the day, the shaft is only fastened to the top of the control box by 2 pop rivets (and covered with a bucketload of silicone).

Yeah they certainly don't mind splashing the silicone around do they, plenty on there.

The Silicone is only there to stop rain getting in and dripping on to the circuit board as are those long black seals on the edges of the metal work as ALL Whites Machines are tested for 168 hours in continuous Rain to ensure they do not fail in bad weather, And the Speaker is made of waterproof Mylar and it is sealed around the edge so if it gets full up it can not leak in side.

hope this helps,, John

I noticed the clear plastic type stuff in the speaker, good stuff. 168 hours in continuous rain, that's alright then, when I have been out & some rain has started I have tucked the detector under my jacket so it stays dry, guess I won't have to do that anymore,haha.
 
ozziii said:
Ridge Runner said:
ozziii said:
Nuggetbuster said:
SunriseBoy said:
I wish I knew how to do this stuff.

The way the shaft is fastened to the box doesn't impress me. It really doesn't give me the option of a chest mounted set-up, or, getting one of those Anderson straight carbon-fibre shafts and fitting it.

At the end of the day, the shaft is only fastened to the top of the control box by 2 pop rivets (and covered with a bucketload of silicone).

Yeah they certainly don't mind splashing the silicone around do they, plenty on there.

The Silicone is only there to stop rain getting in and dripping on to the circuit board as are those long black seals on the edges of the metal work as ALL Whites Machines are tested for 168 hours in continuous Rain to ensure they do not fail in bad weather, And the Speaker is made of waterproof Mylar and it is sealed around the edge so if it gets full up it can not leak in side.

hope this helps,, John

I noticed the clear plastic type stuff in the speaker, good stuff. 168 hours in continuous rain, that's alright then, when I have been out & some rain has started I have tucked the detector under my jacket so it stays dry, guess I won't have to do that anymore,haha.

If you carry it level in the rain water will not get in and their machines with meters on have either a Gaskit or a Tongue and Groove set up that won't let water get In along with their normal weather resistant seals., Ok

john
 
Yeah that would have been me Pat, was going to see if I could get someone to do it for me but decided to have a look, once I seen inside I realised I would be able to do it alright. Was just worried about stuffing something up but it still works so its all good.
 
ozziii said:
That's ok John, after looking inside the box I can see how it would be reasonably water proof, just good to know it can handle a fair bit.

Also seeing as you have had it apart did you notice there are Rubber "O" rings on all the Pots so water can't get in that way either,

John
 
The SPP is very light and can be swung all day with no ill effects or aches and pains. Hence no real point to a chest or hip mount, plus the control box helps balances out the weight of the coil if using anything larger than the 9x5". Mounting on a straight shaft wouldn't be too hard if you wanted to go down that route, grab one of these http://www.ebay.com.au/itm/Plugger-...es-PI-Beach-Hunter-ID-Detectors-/300828983221 and remount the control box with either rivets or bolts.

Quite frankly, I reckon the less you move the coil cable on a PI detector the better, only leads to plug and cable wear issues after a while. (my infinium knows all about that problem). ;)
 
Ridge Runner said:
ozziii said:
That's ok John, after looking inside the box I can see how it would be reasonably water proof, just good to know it can handle a fair bit.

Also seeing as you have had it apart did you notice there are Rubber "O" rings on all the Pots so water can't get in that way either,

John

No didn't see them, although I only pulled it apart far enough to let me get the plug & switch in without having to unplug anything else & without putting any tension on the other wires. Tried not to move it to much while it was apart so didn't look at very much, just done what I needed to a closed it back up.
Sounds like they have done a decent job to make sure no water would get in too easily.
 
ozziii said:
Ridge Runner said:
ozziii said:
That's ok John, after looking inside the box I can see how it would be reasonably water proof, just good to know it can handle a fair bit.

Also seeing as you have had it apart did you notice there are Rubber "O" rings on all the Pots so water can't get in that way either,

John

No didn't see them, although I only pulled it apart far enough to let me get the plug & switch in without having to unplug anything else & without putting any tension on the other wires. Tried not to move it to much while it was apart so didn't look at very much, just done what I needed to a closed it back up.
Sounds like they have done a decent job to make sure no water would get in too easily.

Yeah all of them are O ring sealed etc but I still put Padded covers on my machines because I Never let them get knocked around,

john
 
Ridge Runner said:
ozziii said:
Ridge Runner said:
ozziii said:
That's ok John, after looking inside the box I can see how it would be reasonably water proof, just good to know it can handle a fair bit.

Also seeing as you have had it apart did you notice there are Rubber "O" rings on all the Pots so water can't get in that way either,

John

No didn't see them, although I only pulled it apart far enough to let me get the plug & switch in without having to unplug anything else & without putting any tension on the other wires. Tried not to move it to much while it was apart so didn't look at very much, just done what I needed to a closed it back up.
Sounds like they have done a decent job to make sure no water would get in too easily.

Yeah all of them are O ring sealed etc but I still put Padded covers on my machines because I Never let them get knocked around,

john

That's pretty good that they are sealed like that, good to know. Will still try to keep it out of the rain but atleast now we know it won't cause any problems if a little water does get on it. Would like to get a hold of one of them padded covers myself, just a bit of extra protection & added insurance against damage, scratches etc, we like to keep things in as good as condition as possible so they are a good idea.
 

Latest posts

Top