


grippsy25
Matt
- Joined
- Jan 6, 2014
- Messages
- 38
- Reaction score
- 5
After seeing another member of the forum (Ryan J) do a Bunnings build recently I've been inspired to build my own in a similar vein.
Im only in design process right now for a couple of reasons: a) holding out hoping I win the sluice in the Easter Raffle haha and b) I'm still pretty new to this whole thing and I predict I'm going to NEED some feedback, so no need to rush into the build and end up with a "sluice" that doesn't work.
So I tried to do research before I started but found info to be fairly scarce. In terms of things like overall size, shape, length and riffle size, shape, spacing etc there doesn't seem to be any definite answers. Lots of answers such as "depends on how much water flow you'll have", or "depends what size you'll be classifying your material" etc. Not exactly what I was looking for, but helpful none the less. So all in all, my research taught me that pretty much any design (within reason) will catch gold...some just more than others.
So without the guidance I initially wanted I went about designing the sluice on paper...the following is what I've come up with. Who knows if it's workable or not...certainly not me. This is where the knowledgeable people here come in and critique it for me, tell me what'll work, and what won't...then I can get the built right the first time.
Just FYI, I rounded off numbers here or there but they're basically accurate. And the pics are a little askew since I didn't get them from directly above, so ignore that too")
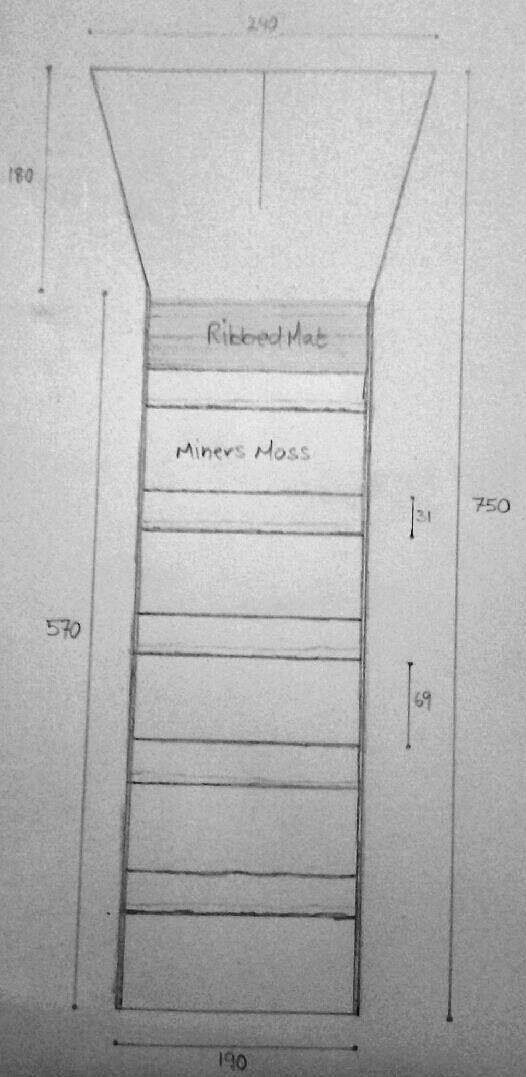
Specifications: (all dimensions shown in millimeters)
Overall Length: 750
Flared Mouth Length: 180
Flared Mouth Width: 290
Riffle Section Length: 570
Riffle Section Width: 190
Riffle Spacing: 69
Riffle Length: 31
Riffle Height: 17.5
Wall Height: 70
Materials list: so far...
- Marine Ply
- Corner Brackets (x10) -> I'll be using rivets like Ryan J used.
- Bayliss 40x60cm Synthetic PVC Mat -> once cut down I'll get two mats to use from the 40x60 mat
- Pine Riffles 35x10xVarious lengths -> free, got a bunch lying around.
Not sure what adhesive I should use. Ryan J used Araldite...guess I'll get that too unless there is something better to use? After all, if I recall Ryan J said he already had the araldite lying around.
Also, for the flared out section, Ryan J put in chopping boards in there...is there a specific reason the chopping boards were used? Could I use something else, like a 5mm acrylic sheet, for example?
All in all, looks like I'll be able to do this build for about $65 (costed via the bunnings website). Not a bad price for a (hopefully) functional sluice. Plus, it's an excuse to play with the power tools for a couple of hours
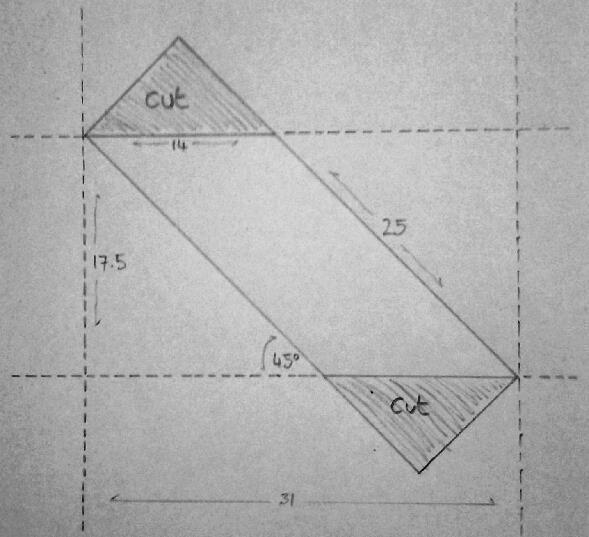
Now, the riffles im not really sure about. I don't know if they're too tall or too short, a good or bad shape, a good or bad angle, to wide or too narrow....I'm lost. Are timbre riffles even workable at all? I have a sneaking suspicion that this is where I might have to make changes. Th reason im not using metal is because I don't have the skills or tools to work with metal, so wood it is. We'll see...
My idea is to use 35x10 dressed pine for the riffles, routing two opposing edges to end up with a parallelogram. This give me a riffle with the dimensions shown in the picture below. Im not sure how well the pine will hold up, but I've already got it so I'll try it for now.
As you can see that process will give me 17.5mm high parallelogram shaped riffles. I'll then take two strips of the marine ply and fix them to the outside of the riffles (making something resembling a ladder so I can lift the riffles out to remove the mat for cleanup). How do you think the riffles themselves will work? The spacing okay? And just the general set up?
Basic design, shape and dimensions
Riffle shape and size
Water flow would be from right to left in picture above.
Riffle Strips
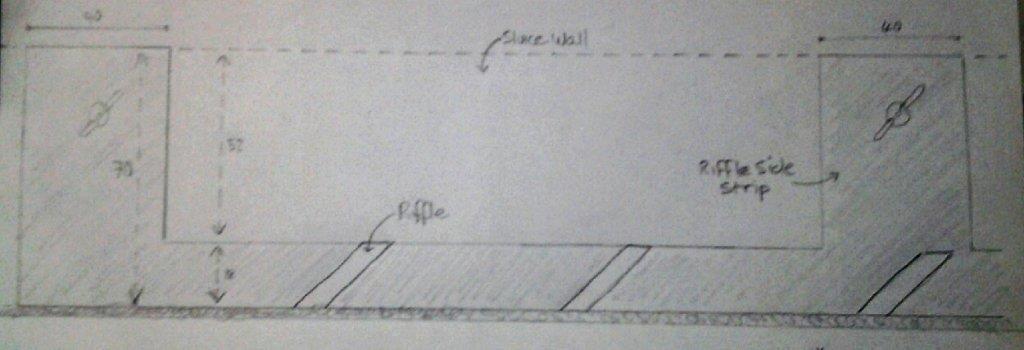
In case I wasnt clear I thought I would try and draw a picture to illustrate.
18mm high, with 40mm wide sections raised level with side of sluice (70mm in pic, but will be smaller depending on thickness of the mat). I needed a way to make sure the riffle "ladder" sits firmly in place down against the bayliss mat, so decided to have the raised sections through which I'll pop a bolt with a wing nut for easy removal. Three raised section on each side...one at either end and one in the middle should hold it firmly in place.
So hopefully someone can make sense of all that and give me some guidance before I go any further. Thanks in advance.
Im only in design process right now for a couple of reasons: a) holding out hoping I win the sluice in the Easter Raffle haha and b) I'm still pretty new to this whole thing and I predict I'm going to NEED some feedback, so no need to rush into the build and end up with a "sluice" that doesn't work.
So I tried to do research before I started but found info to be fairly scarce. In terms of things like overall size, shape, length and riffle size, shape, spacing etc there doesn't seem to be any definite answers. Lots of answers such as "depends on how much water flow you'll have", or "depends what size you'll be classifying your material" etc. Not exactly what I was looking for, but helpful none the less. So all in all, my research taught me that pretty much any design (within reason) will catch gold...some just more than others.
So without the guidance I initially wanted I went about designing the sluice on paper...the following is what I've come up with. Who knows if it's workable or not...certainly not me. This is where the knowledgeable people here come in and critique it for me, tell me what'll work, and what won't...then I can get the built right the first time.
Just FYI, I rounded off numbers here or there but they're basically accurate. And the pics are a little askew since I didn't get them from directly above, so ignore that too
Specifications: (all dimensions shown in millimeters)
Overall Length: 750
Flared Mouth Length: 180
Flared Mouth Width: 290
Riffle Section Length: 570
Riffle Section Width: 190
Riffle Spacing: 69
Riffle Length: 31
Riffle Height: 17.5
Wall Height: 70
Materials list: so far...
- Marine Ply
- Corner Brackets (x10) -> I'll be using rivets like Ryan J used.
- Bayliss 40x60cm Synthetic PVC Mat -> once cut down I'll get two mats to use from the 40x60 mat
- Pine Riffles 35x10xVarious lengths -> free, got a bunch lying around.
Not sure what adhesive I should use. Ryan J used Araldite...guess I'll get that too unless there is something better to use? After all, if I recall Ryan J said he already had the araldite lying around.
Also, for the flared out section, Ryan J put in chopping boards in there...is there a specific reason the chopping boards were used? Could I use something else, like a 5mm acrylic sheet, for example?
All in all, looks like I'll be able to do this build for about $65 (costed via the bunnings website). Not a bad price for a (hopefully) functional sluice. Plus, it's an excuse to play with the power tools for a couple of hours
Now, the riffles im not really sure about. I don't know if they're too tall or too short, a good or bad shape, a good or bad angle, to wide or too narrow....I'm lost. Are timbre riffles even workable at all? I have a sneaking suspicion that this is where I might have to make changes. Th reason im not using metal is because I don't have the skills or tools to work with metal, so wood it is. We'll see...
My idea is to use 35x10 dressed pine for the riffles, routing two opposing edges to end up with a parallelogram. This give me a riffle with the dimensions shown in the picture below. Im not sure how well the pine will hold up, but I've already got it so I'll try it for now.
As you can see that process will give me 17.5mm high parallelogram shaped riffles. I'll then take two strips of the marine ply and fix them to the outside of the riffles (making something resembling a ladder so I can lift the riffles out to remove the mat for cleanup). How do you think the riffles themselves will work? The spacing okay? And just the general set up?
Basic design, shape and dimensions
Riffle shape and size
Water flow would be from right to left in picture above.
Riffle Strips
In case I wasnt clear I thought I would try and draw a picture to illustrate.
18mm high, with 40mm wide sections raised level with side of sluice (70mm in pic, but will be smaller depending on thickness of the mat). I needed a way to make sure the riffle "ladder" sits firmly in place down against the bayliss mat, so decided to have the raised sections through which I'll pop a bolt with a wing nut for easy removal. Three raised section on each side...one at either end and one in the middle should hold it firmly in place.
So hopefully someone can make sense of all that and give me some guidance before I go any further. Thanks in advance.