How to make a Trommel on the cheap but very effective.

Prospecting Australia

Help Support Prospecting Australia:

This site may earn a commission from merchant affiliate links, including eBay, Amazon, and others.
Joined
Jan 1, 2014
Messages
47
Reaction score
5
Hey everyone here is a link i found a few months ago.

I cant post links since im new....google Mike's Hand Trommel :)

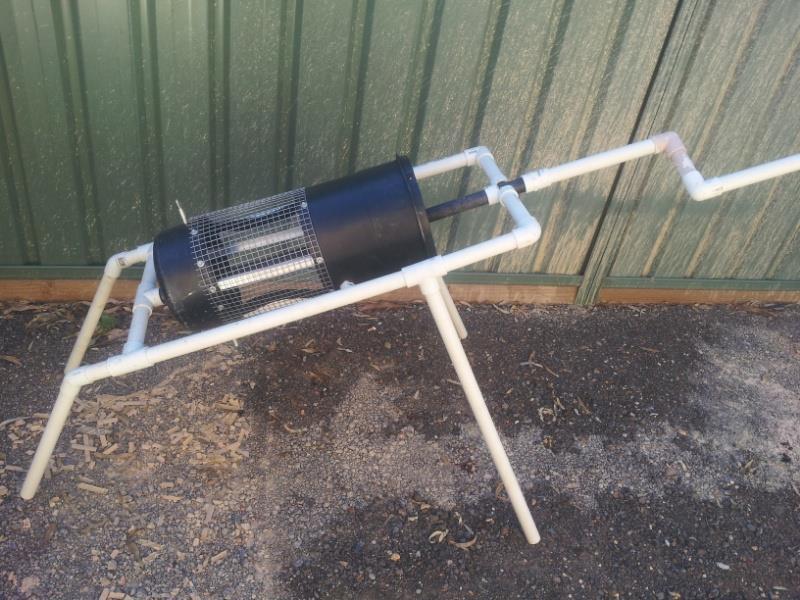
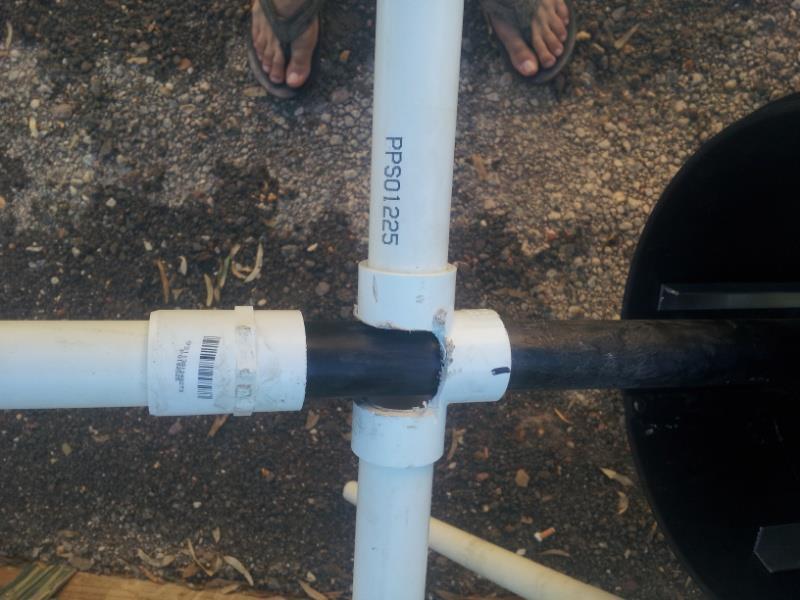
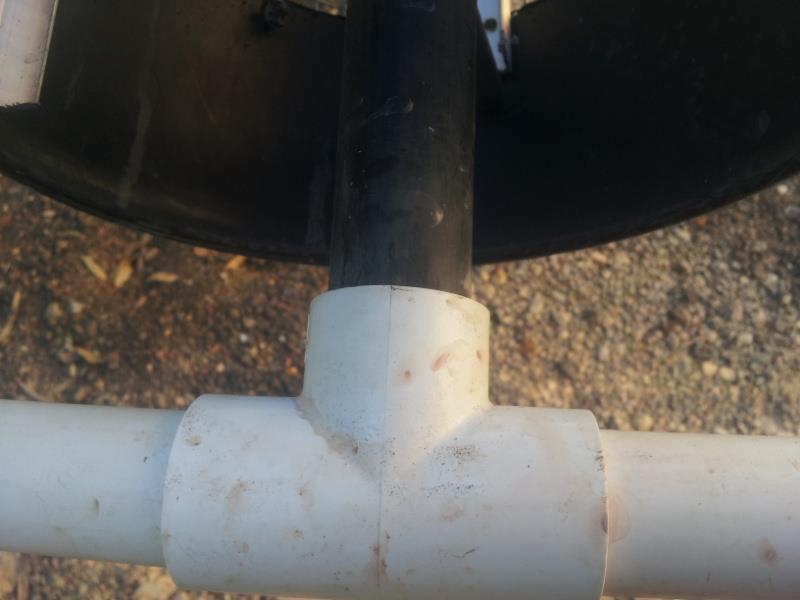
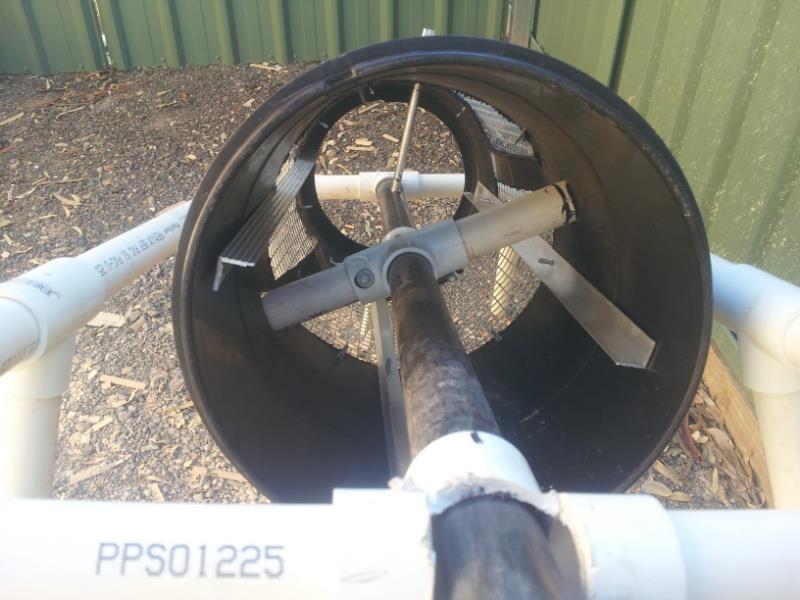
It is called Mike's Hand Trommel. I built one 2 months ago and I have increased my dirt moved by at least 3 times. I put some 20mm pipe around the top of it and have a battery powered pump pumping into it. I made a few other little changes to it but its an awesome idea and worth sharing :)
 
Fine tuning mine atm. Its not as easy as old mike makes out. And i would have loved to have done it on his $50 estimations. I'd say closer to double that. If anyone is thinking of doing this let me know, I'll put some pics up and describe my solutions to some of the technical problems i encountered. Cheers.
 
I'm fine tuning still but it works good, portable and effective can't ask for more than that. There's a couple of little tricks i would highlight to you that i did differently to make it a bit easier to save a bit of the hassle but i would need to post some pics and a description. I'm rubbish at reading directions so i did it a little on the fly and improvised but basically the setup is the same. Id like to build a stronger bigger one in time from what i learnt. I'll try and get it done today, posting up but I'm notoriously unreliable due to my work. Keep checking in and if your patient you can send me a couple of PMS if you have Amy further questions. GT.
 
1393110590_img_20140223_100408.jpg

Hers a pic of the overall trommel. I started with two bucket ends but eventually went with the inside plastic of a flip top bin.
 
The advantage here was i had a complete barrel to base my measurements on, and a thicker wall to drill into. I marked out using a texta where the cuts and holes should be after taking my centres. Using the existing moulding features you can be pretty damn accurate. I made the frame first without the legs because i had the pipe and joiners. While making the barrel i would suggest leaving the rear leg joiners out until its built, it adds stability to the frame while testing if the barrel runs true (without wobbling). don't glue or screw the frame together until everything is complete, in fact I'm still yet to do this, it will aid fine tuning.
 
Ok so pictured above is the next tough part. Through the centre of the barrel i used a poly pipe riser with threaded ends for two reasons. The first is the outer diameter fitted inside the white fittings without too much hassle, (this using the white poly creates alot of friction) and only needed a small amount of shaving on both the black shaft and white fittings. Secondly it gave me a threaded end to work with at the handle end which was a much stronger connection to drive the winding but removable for transport and storage. At the exiting end of the barrel where the shaft is inserted into the t piece you'll need to taper it slightly rounded it off and add some grease. With the riser this was pretty easy using coarse sand paper to take a fraction off
 
At the handle end i rough cut the t piece, but it loses alot of integrity so i will replace it with a bored out t using a 1 inch drill piece, which the riser will pass through comfortably but without giving too much extra movement, turns out finding that drill piece isn't the simple task i thought it would be. Anyway as much as I'm worried my current solution is fragile is hasn't fractured yet so make of that what you will. I think the white fittings are alot stronger than they look. So now we've got the frame and centre drive shaft covered time for the barrel.
 
The first thing you'll notice is the cross piece. An irrigation place will have these and black risers. Hardware store might not have them. So i split the riser in two and rejoined it with the cross piece. white offcuts were passed through two corresponding midpoints i drilled out. In the original they used metal z shapes but i had no end of trouble, perhaps a better diyer would have more luck but in the end i went with my instinct to over engineer, and spent significantly less time building a stronger connection. Centering proved a challenge but I'll probably split the poly protruding on the outside into 4 and glue or rivet it to the barrel, until i get that t piece bored I've left it. Further down i drilled through the riser and put a aluminium shaft through for stability, again I'll pinch the extra over once I'm finished. The barrel is completed but cutting away the section for the mesh, and inserting it. Note, the stronger the mesh (broader the guage) the harder it is to get it a nice round shape. I wound it around a slightly smaller barrel but this by no means easy. My suggestion is take your time and persist, eventually it will take shape, but next time id go internally instead of externally using the pressure of the mesh to push outward on the inside of the barrel instead of man handling it while trying to fix it into position.
 
Finally i fixed some aluminium off cuts i had to aid in agitation (can't get spray bars in there) and stability for the shape. I drilled outwardly into it to get three mesh to sit flatter aswell. I hope that helps, i feel like i haven't covered it as well as id like, but i think you get the overall picture. I have a removable feeder for it but I'll let your creative talents solve that one, it wasn't easy, and for the effort prob not worth it.its lightweight but surprisingly strong and beats being hunched over classifying. I got some aluminium sheet to make up an under guard for distributing straight into a sluice when I'm done I'll put up a pic of it operating. Good luck with it, and thanks for reading. GT.
 

Latest posts

Top