Setting Up Detector Test Holes.

Prospecting Australia

Help Support Prospecting Australia:

This site may earn a commission from merchant affiliate links, including eBay, Amazon, and others.
Joined
Mar 5, 2017
Messages
155
Reaction score
235
G'day there,

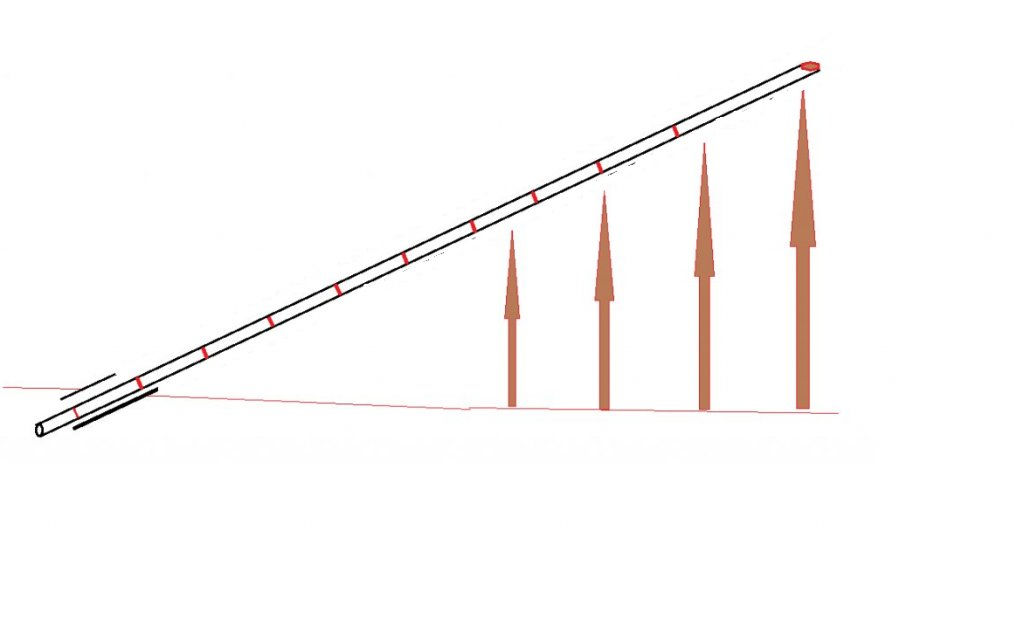
I'm looking at setting up some permanent test holes to play around the settings on my 7000.

Has any one got any recommendations on depth of the holes & size of test pieces that I should use to get the best testing?

I was thinking of setting them up permanently, so thinking about using lead as the test pieces.

Given the weight differences between gold & lead (19.32 versus 11.34 g/cc). Would I adjust the size of the lead sample be same size as the piece of gold that I'm substituting it for? i.e. If I wanted to simulate a 19.32 piece of gold I'd use a 11.34 piece of lead as my test piece?

Or would it be much better if I didn't set up a permanent test site & just used gold?

Best regards

Bullwinkle
 
If you are going for a permanent installation then I suggest that you put in half a dozen or so lead splitshot / ball sinkers. Using a round target means there is no orientation issue and it cant change over time. You can buy small selection packs of split shot for a few bucks and the larger balls you can buy individually.

Air test them first so that you choose ones that are say 25mm difference in depth upto 100mm then 100mm different in depth up to maximum depth detectable by your detector. For god sake dont bury them at the air test depth though as you wont find them once the dirt is on top. How much less youll just have to figure out.

For the smaller balls I used a piece of 1/4 stainless tube with the end mostly plugged to drive the test piece into the ground bit by bit testing with MD as I went until I got the signal strength I wanted. For the bigger pieces I used a portable drill with an old fencing auger bit and extension piece to get down to about max 600mm. Lots of ways to get them in, disturbing the soil more or less in the process. All depends on your soil.

I made a test pit like this once and worked well for a few years but I moved so now I just build a temporary test bed using some bits of slate & terracotta tile and pile them up layer by layer on top of the target until can just detect the signal. I get 10mm resolution that way if I want. The good bit about this method is you can then play with all the MD settings and add & subtract tiles until you get a picture of how the settings affect depth on various targets. Also by changing from slate to terracotta it really changes where the MD ground balances and how deep it detects so that makes it interesting too. Also you can then use gold test pieces if you want

It reality it doesn't really matter whether you use gold or lead since the shape & purity of the gold will significantly affect its detectability anyway. Also metal detection uses eddy currents which is mainly a surface phenomenon and more related to shape & conductivity of outer layer of whatever is being detected than its weight - hence a 15g crushed alu can being detectable at over a metre with some detectors but a 15g nugget would most likely be under half that distance.

I suggest a coin such as 5c and 50c piece be included as it is a good common ref between different people & places to chat about over a beer and you can bury one when you go out detecting & see how your test pit compares with your detecting locations in terms of mineralisation.
 
I like the idea of putting a PVC pipe down at about 30. This way you can move your target up and down and you can also insert another inner PVC with a different sized target. You can insert a nugget, lead, steel or a coin.

1587177416_tube.jpg


Lay it out on the ground first. You need an outside tube then another marked off in increments indicating the depth. The target will be connected to the end of the movable inner tube.
 
XLOOX,

You don't require a trenching shovel.
A length of PVC pipe and a hosepipe with a water supply.
Turn water on and push hose down into PVC until it reaches ground level.
Keep pressure on the PVC at the angle you require and it will sink into the ground, with water carrying sand back up and out of PVC.

**This method is also ideal if you wish to strengthen your boundary fence from strong winds by vertically inserting galvanised pipe at intervals.**
 
Moneybox said:
I like the idea of putting a PVC pipe down at about 30. This way you can move your target up and down and you can also insert another inner PVC with a different sized target. You can insert a nugget, lead, steel or a coin.

https://www.prospectingaustralia.com/forum/img/member-images/3960/1587177416_tube.jpg

Lay it out on the ground first. You need an outside tube then another marked off in increments indicating the depth. The target will be connected to the end of the movable inner tube.

I have been Using the pvc in the ground for a long time now and I feel its the best method of testing and comparing machines and coils

Adding onto money box post the pvc pipe is set at I think 33 degs and at this angle as you push the target down the pipe and stop when the signal stops you measure the distance between ground level and the target on what you are sliding your target down the pvc pipe on then simply half that measurement and you get the depth.
Hope this helps :cool:
 
Nightjar said:
XLOOX,

You don't require a trenching shovel.
A length of PVC pipe and a hosepipe with a water supply.
Turn water on and push hose down into PVC until it reaches ground level.
Keep pressure on the PVC at the angle you require and it will sink into the ground, with water carrying sand back up and out of PVC.

I believe this method is better than digging because it disturbs the ground less, and results in a more realistic response from the MD...

If it proves difficult to get the PVC pipe into the ground, insert it into a close fitting glav pipe and drive both into the ground to where you need then withdraw the glav leaving the PVC in place...
 
If you are concerned about the depth of the target on your finished project just drag the inner tube out and turn it around. Measure the target up from the ground and mark off your tube with each depth. That way the angle it's inserted into the ground doesn't matter.

1589936416_test_holes2.jpg


:cool: :pickshovel: :goldnugget:
 
I think Moneybox's is pretty much on the money. Another is an eroded bit of ground in the typical type of area you hunt in at varying depths. Used to be a few in my area but mongrels dug them up or put targets all over the place to stuff it all up. Typical. But either in your typical ground you hunt in is an ok try. Nothing will ever beat undug gold targets but a good test spot like Money showed is fair. You can replicate that in all ground types regardless of erosion or whatever.
Here is a fact.
When the GP Xtreme was released and had issues, and man did it have some. That exact same test type, exact, was utilised in Dunolly with the late, gee I liked that guy and was there with him at the time, Jim Stewart. The test patch itself was set up by a well known and great mate, along with Jim, Porky. It was near Sporting Flat Dunolly. Minelab sent a guy over called Phil. We spent over a week trying to sort depth, sensitivity and tracking things out. Actually think it was more like near 2 weeks and a bit. But that type of test set up, shown by Money, was, fact, the exact type set up at Sporting Flat Dunolly that ended up sorting out the GP Xtreme issues. True story.
 
Gday all I went out today and set up a small test patch 3pvc tubes at 3 inchs 6inchs and 10 inchs bloody hard digging will probably add more at another time dug trenches then back filled every couple of inches and stomped it hard great ironstone ground also greenstone and quartz checked every location with a sdc so no targets any where in vicinity I did this as my son has just given me a new 11 inch Coiltek extreme coil for my sdc for doing some work on his car so I now have the stock coil a 14x9 and now the 11inch will be great to test them I will let you know how i go with them cheers Muk.
1590314478_00ea8473-9b6e-4c7f-b0e6-970e136ba82c.jpg

1590314478_7bcf335a-4540-43c6-9b3d-68b9a4b0f9df.jpg

1590314478_e77ff911-6383-4caf-891e-b04b81c88eec.jpg

1590314479_2c7b412f-5caa-4cf9-90a4-23315281bf95.jpg
 

Latest posts

Top