Jaycar have the Anderson plug covers. Just fitted one on the bumper of the Navara.
You are using an out of date browser. It may not display this or other websites correctly.
You should upgrade or use an alternative browser.
You should upgrade or use an alternative browser.
1993 Bushman camper trailer refit
- Thread starter nucopia
- Start date


Help Support Prospecting Australia:
This site may earn a commission from merchant affiliate
links, including eBay, Amazon, and others.
Thanks limpalot .. Wish I knew that before , I was there a few days back buying a few things .. any way now I have an excuse for tomorrowlimpalot said:Jaycar have the Anderson plug covers. Just fitted one on the bumper of the Navara.
")
This tonights project.
Shade cloth stone guard for the camper ..
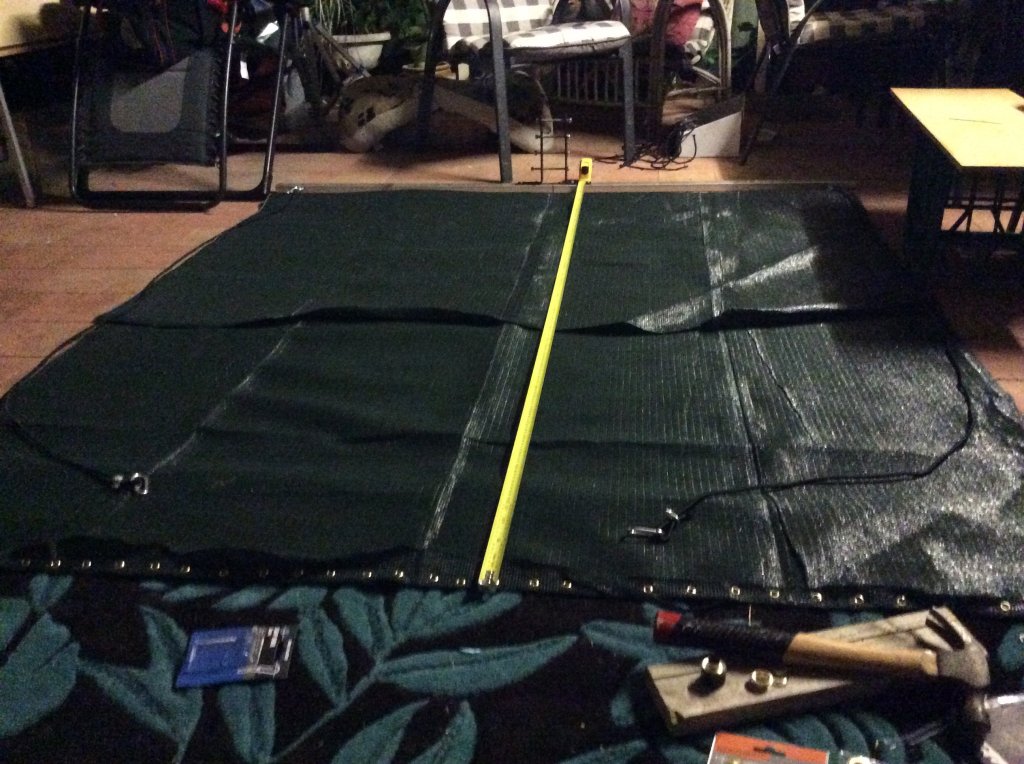
1, shade cloth
2, bungie cord
3, snap hooks
4, wire rope grips
5,butterfly clips
6 assorted brass eyelets
7, 1600mm aluminium square tube
8, 12 stainless eye straps
9, left over side awning brackets x 2
10, 24inch 5/16th threded rode cut to size + 8 x 5/16 nylock nuts
Cost = $140+- from Bunnings
Shade cloth stone guard for the camper ..
1, shade cloth
2, bungie cord
3, snap hooks
4, wire rope grips
5,butterfly clips
6 assorted brass eyelets
7, 1600mm aluminium square tube
8, 12 stainless eye straps
9, left over side awning brackets x 2
10, 24inch 5/16th threded rode cut to size + 8 x 5/16 nylock nuts
Cost = $140+- from Bunnings
Flea bay has the Anderson covers @ $18 with free postage.
Might get a few . One for the back of the tool box for the solar panals.
And a couple to make up connection pionts between the trailer and prado when towing..
Fark this list of things to do never stops growing...
Might get a few . One for the back of the tool box for the solar panals.
And a couple to make up connection pionts between the trailer and prado when towing..
Fark this list of things to do never stops growing...
.
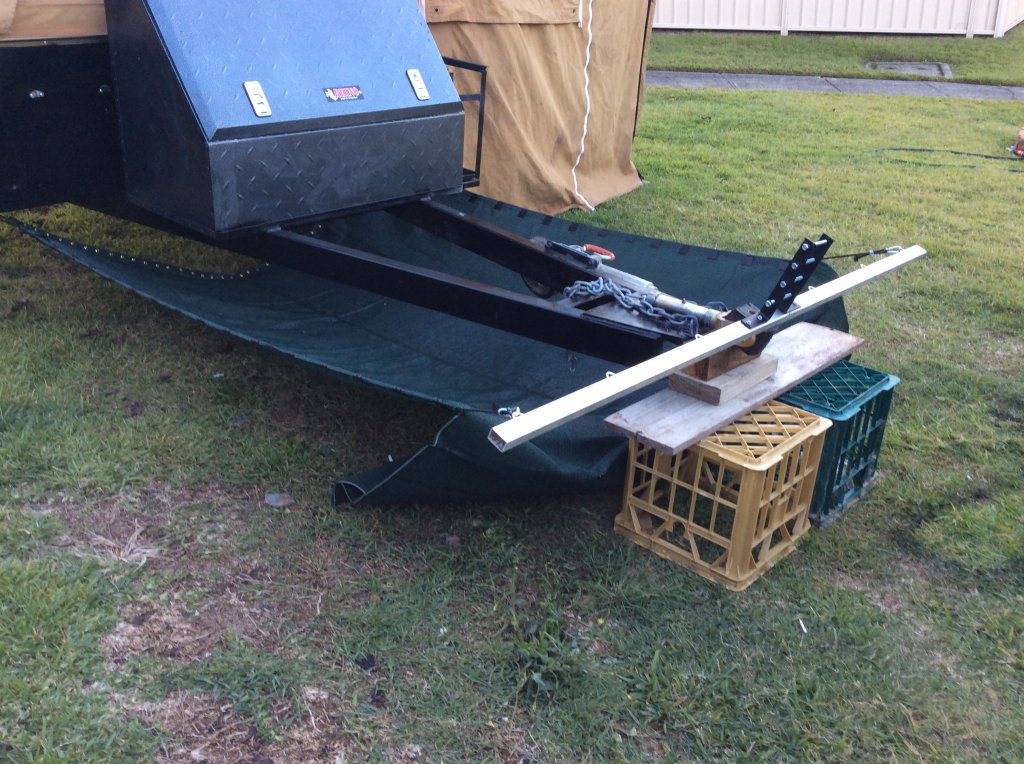
Just put it up to see if I had the right measurments and how it fitted size wise.
Needs some adjustment and the rest of the bungie cords attached.
Still have a way to go before its finished
Just put it up to see if I had the right measurments and how it fitted size wise.
Needs some adjustment and the rest of the bungie cords attached.
Still have a way to go before its finished
Haveing a little bit of trouble getting the stone guard to work.
Not 100% sure but I think i have to attach the camper end of the net in a fixed position under the trailer and the tow ball end of the net via bungie cords to the cross bar that i made to bolt onto my tow ball mount..
I tried using bungie cord both ends but it just made the the netting bunch up ..
Haveing one on those days today .. feel like crap with a heavy bout of IBS and reflux ..triple 0 if it gets any worse 8.(
Fark !
Looking at the stone stompers I think you may need to run four or five runs of shock cord to beat that problem ? Especially given you have a fairly long drawbar ? From looking at their design they even take shock cord points from mid way down the screen, which I would only presume is to take up the centre slack of mesh especially when turning. Personally not a great lover of this type of set up for heavy off road use, as I know where I go it would end up snagged and ripped apart from old dead tree branches etc that get flicked up by rear wheels. Highway and gravel roads may be fine but once you got of the well worn tracks think it would end up in pieces
Think the stand up type screens even though designed more to protect rear windows of canopies and vehicle etc rather than actual stone damage to trailer paintwork, probably maybe more practical in the tough stuff. Just my humble opinion I add here.
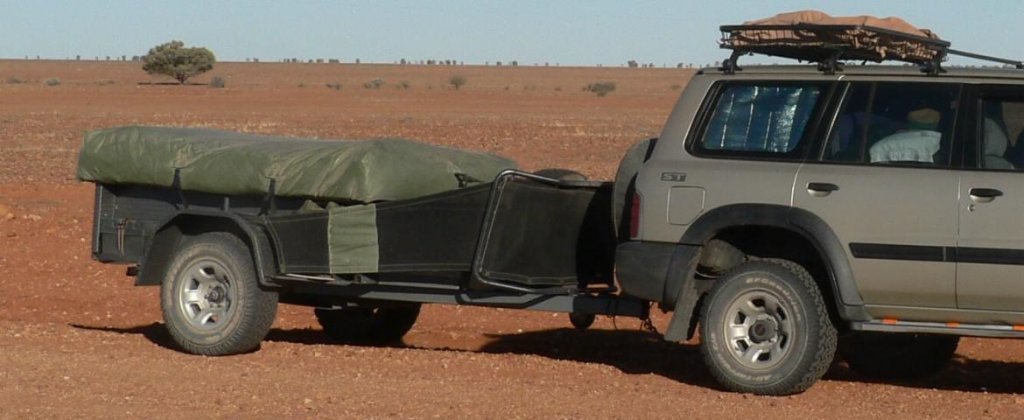
Also probably find you would need to pin your jockey wheel up so that wheel is facing upward, as by the end of a trip screen would probably have a hole worn from rubbing against it ? Pinning jockey wheel up is a good idea in any case, as in certain terrain conditions it will be the first thing to hit the ground, and they usually don't take kindly to being dragged over things with the weight of the rear of vehicle on them, plus can hang you up. Check pics below and you can see how much ground clearance the jockey cuts out by letting it hang.
Think the stand up type screens even though designed more to protect rear windows of canopies and vehicle etc rather than actual stone damage to trailer paintwork, probably maybe more practical in the tough stuff. Just my humble opinion I add here.
Also probably find you would need to pin your jockey wheel up so that wheel is facing upward, as by the end of a trip screen would probably have a hole worn from rubbing against it ? Pinning jockey wheel up is a good idea in any case, as in certain terrain conditions it will be the first thing to hit the ground, and they usually don't take kindly to being dragged over things with the weight of the rear of vehicle on them, plus can hang you up. Check pics below and you can see how much ground clearance the jockey cuts out by letting it hang.
Thanks Trash
Its great to have some one else look at something and see it from a different perspective and the ideas that come with it.
I have 6 points were the bungee cord attaches to the front bar and at the front of the camper..I thing thats what is causing the issue of bunching when I rotate the front bar to simulate turning.
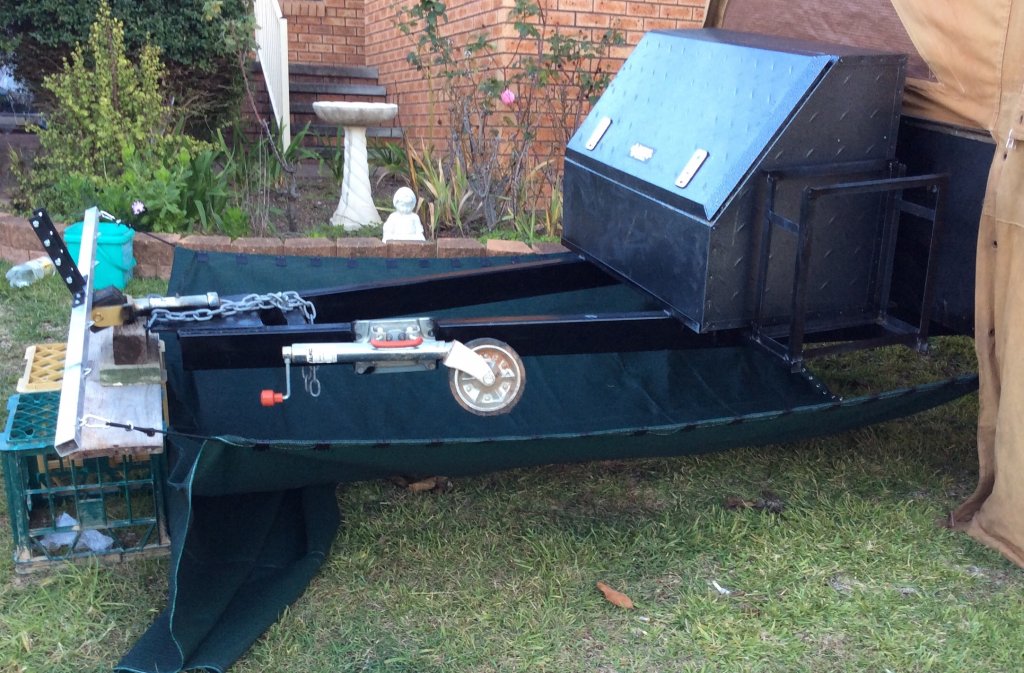
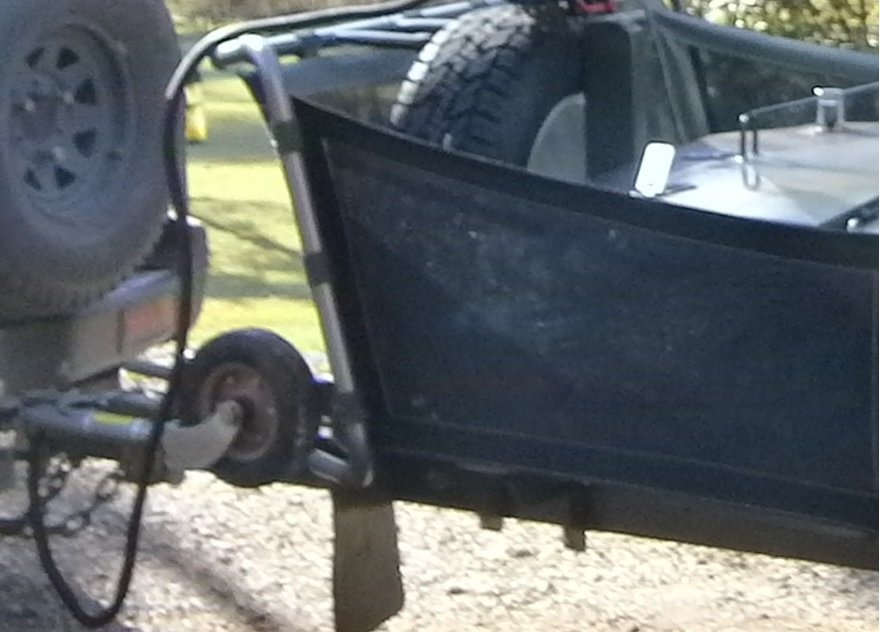
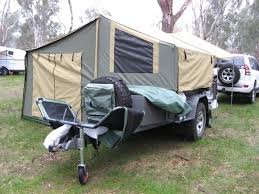
I made a cut out around the head of the draw bar similar to the first pic which makes the netting hang much better.
After I made the cut out the netting now hangs under the jockey wheel and I think it probably has enough clearance to not cause any problems..
I will take some pics tomorrow with the net on the camper and post them up here.
Its great to have some one else look at something and see it from a different perspective and the ideas that come with it.
I have 6 points were the bungee cord attaches to the front bar and at the front of the camper..I thing thats what is causing the issue of bunching when I rotate the front bar to simulate turning.
I made a cut out around the head of the draw bar similar to the first pic which makes the netting hang much better.
After I made the cut out the netting now hangs under the jockey wheel and I think it probably has enough clearance to not cause any problems..
I will take some pics tomorrow with the net on the camper and post them up here.
Goldchaser1
dave
Coming up great nucopia,thats a lot of material to manage up front,keen to see if ya get sorted and problem free,we have a spare in front of the toolbox and made a basic shade cloth guard,no frame as Id prefer,just tie points under draw bar,out to corners of trailer but it rubs the toolbox corners and nearly buggered allready,have a fix for that later some time,doesnt look flash but with a row of conveyer under the trailer where fairing allot better now,those stones can make a mess,especially under the trailer,shocks,plumbing etc,think the stone stomper idea is great Im just wondering if under the trailer is still getting blasted?
Cheers GoldChaser
I still have a lot of figuring out to do to get the thing working as its supposed to ..
I now know its not as simple as it looks in the pics of stone stomped , even the videos don't give away exactly how its set up ..
I think I will just have to keep trying and see which way works best..
I had organically planed to put a regular mesh stone guard mounted across the draw bar and mud flaps hanging down but it did not seem practical to mount one in a fixed position and limit assess to the tool box , in hind sight maybe it was the simpler option.
Nucopia funny you should mention the Stone Stomper not being as simple as it looks. Whilst looking yesterday I couldn't find a vid or even a single picture with the vehicle turning ? Get it sorted and I'm sure many will follow as those Stone Stomper set ups certainly are not cheap. Do you have a pic of how yours is bunching up ? I note on one vid they use a bungy mid section to help support Centre ? Hope it helps you in some way, as the little camper has come a long way since the first pics you posted and full credit for your work. I'm sure it will give you and your family a lot of good memories in return :Y:
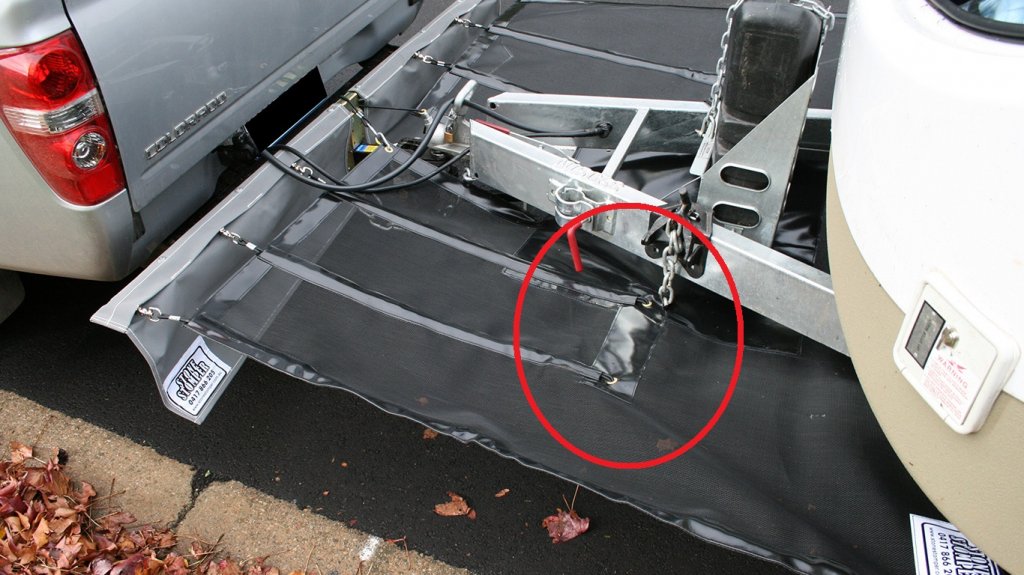
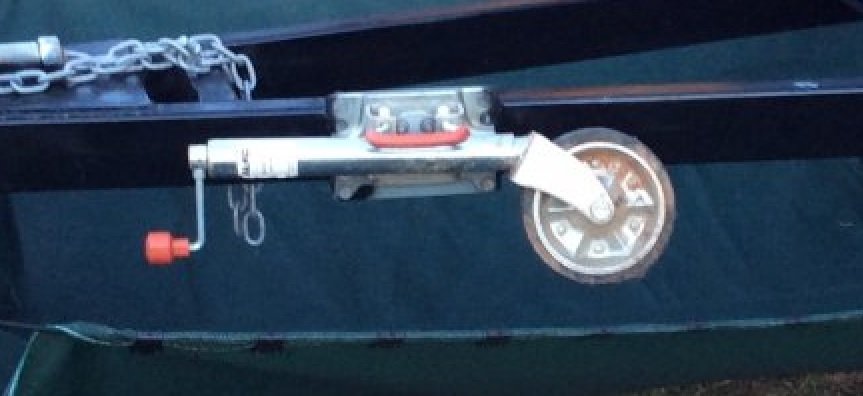
Re front screen set up .............. on the Tambo campers they just fold down to give access and all that holds them up is the shock cord tension from the side curtains. The problem GC is having with the curtains rubbing tool box, they had panels sewn in as can be seen in the bottom pic, as they had the same problem on the early models released.
[video=480,360]https://youtu.be/oxOxzNf7t6Q[/video]
Note pic below it looks like they have wrapped lower hand brake mechanism in foam ? I would say to prevent chafing screen ?
Note in this pic that they have several shock cords that anchor and the others are allowed to slide in a sheath type set up . Maybe this is how they prevent the bunch up ?
Thanks Bogger.
Its a bit of a mystery how the bloddy thing functions thats for sure. I have tried several ways to set up the net and attached it to the bungee cord. At first I threaded the cord on the outer two edges and clamped the netting over the cord this matde the net square and hold shape but when I rotated the front bar to simulate the turning of the vehicle the netting bunched. Next I swapped the cord for clothes line plastic rapt cord $5 for 30 mtres and then attached the bungee cord to the two outer edges using zip ties.I used snap hooks to fasten each end of the cord to the bottom of the camper and the front cross bar.. result was that the netting still bunched but not nearly as bad as before.. to me it looked as if the camper end of the netting needs to be attached in a fixed position and only the cord attached at the tow ball cross bar end allowed to stretch when the vehicle turns.. result..looked a lot better but it still made the netting bunch at the leading edge nearest the bar up to about a third of the way down the net and left a 12 to 15 inch gap between the edge of the net and the tow ball cross bar when return to nuetral position.
By this time it was late afternoon and I was feeling like crap yester day, so I packed up and left it over night.
Im pretty sure what works is running the cord through loops attached to the netting, on both outer edges and down the side of the netting about 15 inches inside the outer edge.
Down the centre of the net in line with the tow ball and the center of the camper it does not matter so much to have movement, in fact I think the less movement towards the center of the netting in line with the tow ball helps keep the netting in place i.e its the pivot point around which the center of the netting turns. So havings minimal stretch there is probably something to aim for.
Here is a few pics of different aspects of the net.
This is netvfrom the camper towards the draw bar with the net (ground looking up) underneath view.
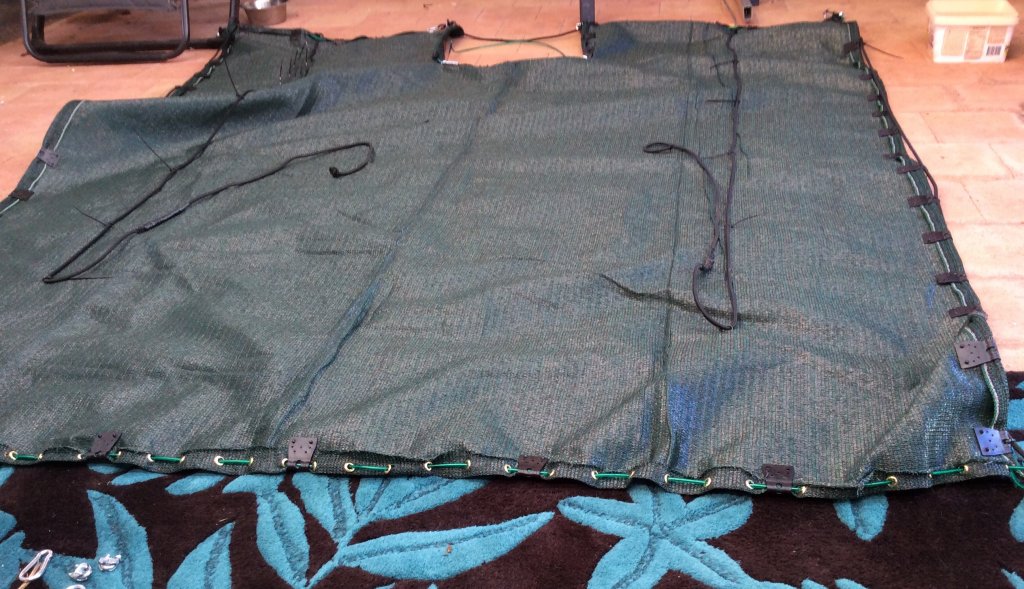
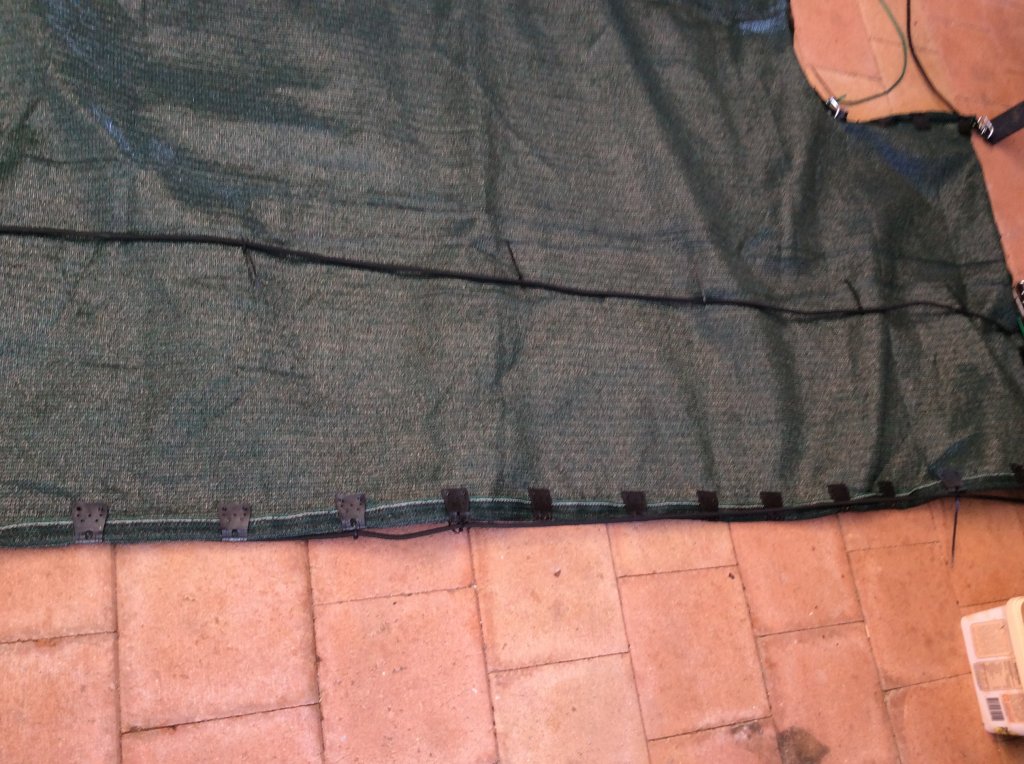
Side view showing outer edge
Front of the net with the draw bar cut out. I think I need to experiment ways to attach the section to the cross bar
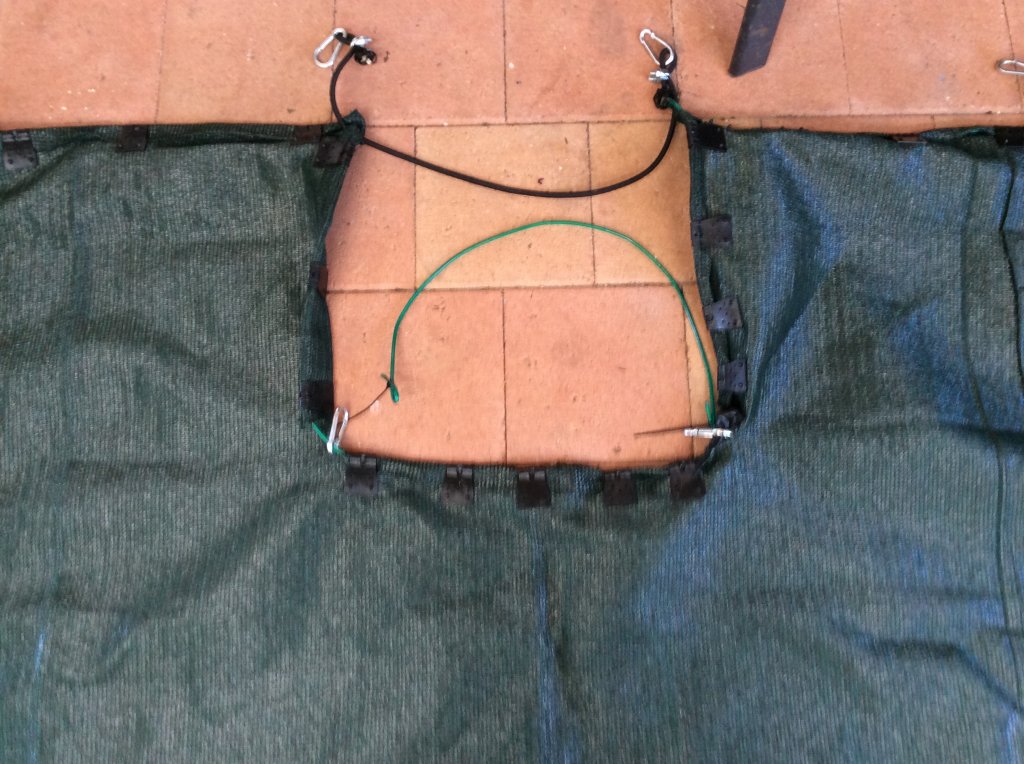
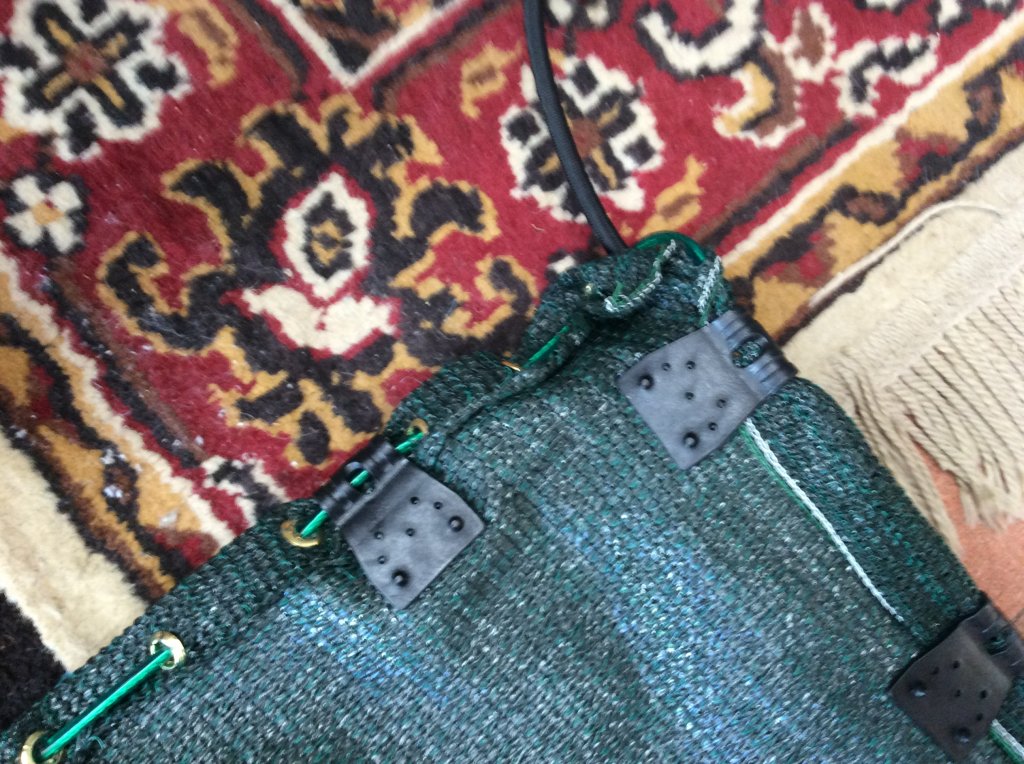
Camper end corner of net.
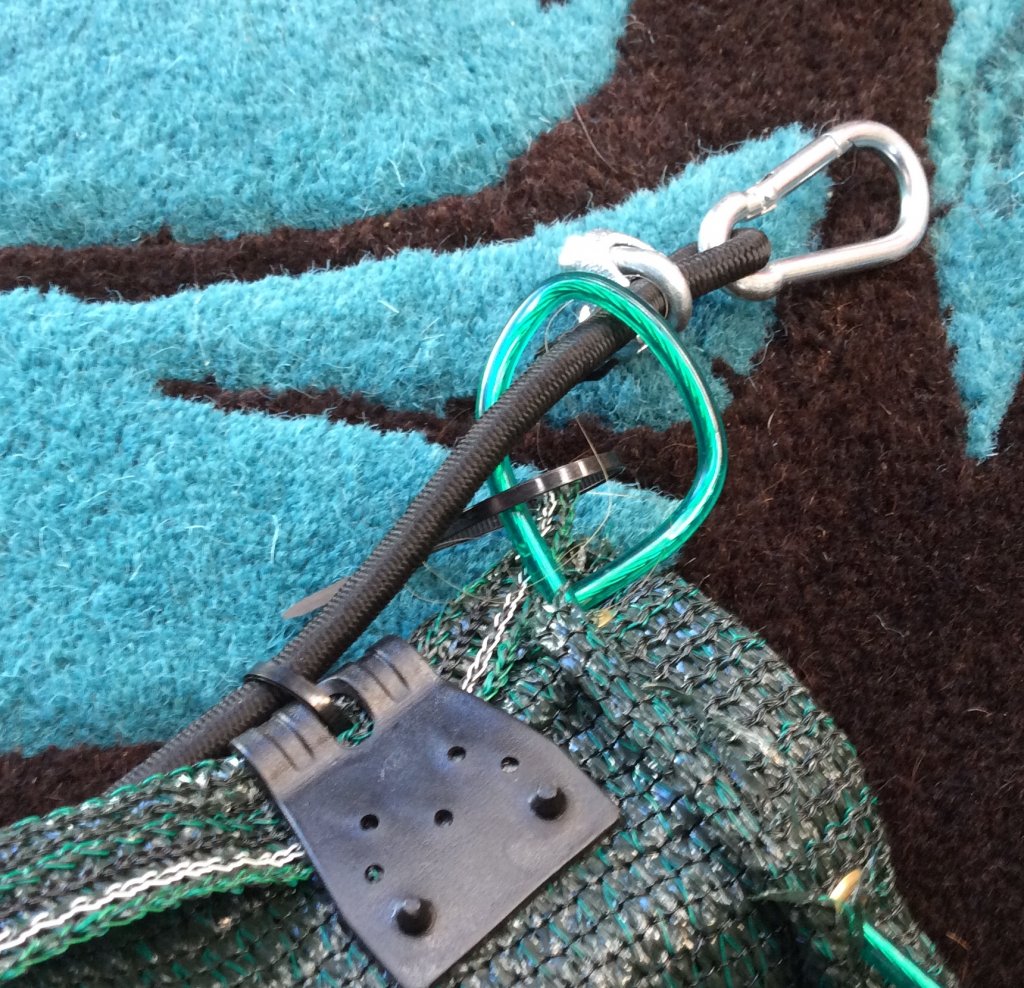
Cross bar end corner of the net.
I think if I can get the two side edges functioning properly and the center of the net to keep an equie distance to the cross bar through a full range of motion during turning, then I might be a whole lot closer to solving the cunundrum
Will try and set it up again this afternoon and try out a few different configurations to see what works best..
Its a bit of a mystery how the bloddy thing functions thats for sure. I have tried several ways to set up the net and attached it to the bungee cord. At first I threaded the cord on the outer two edges and clamped the netting over the cord this matde the net square and hold shape but when I rotated the front bar to simulate the turning of the vehicle the netting bunched. Next I swapped the cord for clothes line plastic rapt cord $5 for 30 mtres and then attached the bungee cord to the two outer edges using zip ties.I used snap hooks to fasten each end of the cord to the bottom of the camper and the front cross bar.. result was that the netting still bunched but not nearly as bad as before.. to me it looked as if the camper end of the netting needs to be attached in a fixed position and only the cord attached at the tow ball cross bar end allowed to stretch when the vehicle turns.. result..looked a lot better but it still made the netting bunch at the leading edge nearest the bar up to about a third of the way down the net and left a 12 to 15 inch gap between the edge of the net and the tow ball cross bar when return to nuetral position.
By this time it was late afternoon and I was feeling like crap yester day, so I packed up and left it over night.
Im pretty sure what works is running the cord through loops attached to the netting, on both outer edges and down the side of the netting about 15 inches inside the outer edge.
Down the centre of the net in line with the tow ball and the center of the camper it does not matter so much to have movement, in fact I think the less movement towards the center of the netting in line with the tow ball helps keep the netting in place i.e its the pivot point around which the center of the netting turns. So havings minimal stretch there is probably something to aim for.
Here is a few pics of different aspects of the net.
This is netvfrom the camper towards the draw bar with the net (ground looking up) underneath view.
Side view showing outer edge
Front of the net with the draw bar cut out. I think I need to experiment ways to attach the section to the cross bar
Camper end corner of net.
Cross bar end corner of the net.
I think if I can get the two side edges functioning properly and the center of the net to keep an equie distance to the cross bar through a full range of motion during turning, then I might be a whole lot closer to solving the cunundrum
Will try and set it up again this afternoon and try out a few different configurations to see what works best..
Yes I think your on it :Y: The only thing I can see in their set up is that the cord would be able to move freely in the sheathing that they have sewn to mesh. In saying that if you look in one of the vids on utube, when they take a left corner you can see that the outer of mesh does droop downward and it's not a really sharp turn, just a bend in the road. You might need to hook it up and take it for a drive with the wife videoing out the back window and see how it behaves ? Looking at their set up, I fail to see anything to take up the slack of mesh when the distance between trailer and vehicle decreases. A metre of mesh is a metre of mesh and there is nothing there to gather the slack when the distance decreases ? Maybe they just don't worry about it ? I'd love to see a turn in a car park for example. what their mesh does ? :Y:
The second vid is an interesting set up ................. two arms but neither attached to vehicle :Y:
Have a look at vid about 3.10 into it ..................... outer edge gets very loose.
[video=480,360]https://youtu.be/mWTkFUD7_Nk[/video]
[video=480,360]https://youtu.be/3KUTvduHsBk[/video]
The second vid is an interesting set up ................. two arms but neither attached to vehicle :Y:
Have a look at vid about 3.10 into it ..................... outer edge gets very loose.
[video=480,360]https://youtu.be/mWTkFUD7_Nk[/video]
[video=480,360]https://youtu.be/3KUTvduHsBk[/video]
shakergt
Moderating Team
Nucipa just an idea for you. You could possibly put a main switch between the battery and the start of your circuit. it helps for preventing things accidently being turned on or left on when the camper is not being used or set up. I put one in mine and it works a treat.
Like one of these

Like one of these
Good idea Shakergtshakergt said:Nucipa just an idea for you. You could possibly put a main switch between the battery and the start of your circuit. it helps for preventing things accidently being turned on or left on when the camper is not being used or set up. I put one in mine and it works a treat.
Like one of these
https://www.prospectingaustralia.com/forum/img/member-images/10374/1529990922_s-l1600.jpg
That look pretty sweet..
Might be a better idea than using the reset circuit breaker as a switch
the 2 way switch I bought ages ago for the camper has grown legs and gotten lost
Im just waiting on a few fleabay deliveries before tackling the rest of the wiring, which is more of a mystery to me than this bleeding stone net is ..
shakergt
Moderating Team
To me it looks like you are on the right track with the wiring. :Y:
Goldchaser1
dave
nucopia where did you get them plastic clips or fittings on the side of the shade cloth?
Bought them at Bunnings, they are called butterfly clips and they are used to clip the shade cloth to wire fencing.Goldchaser1 said:nucopia where did you get them plastic clips or fittings on the side of the shade cloth?
$10 for a pack of twenty.
shakergt said:To me it looks like you are on the right track with the wiring. :Y:
Im taking my time with the wiring..I dont want to make any mistakes..
shakergt
Moderating Team
nucopia said:shakergt said:To me it looks like you are on the right track with the wiring. :Y:
Im taking my time with the wiring..I dont want to make any mistakes..
Yep I hear you one that one. Do it right once and not twice.
Similar threads
- Replies
- 2
- Views
- 355
- Replies
- 41
- Views
- 16K