Croc Gold Trap Fluid Bed Sluice

Prospecting Australia

Help Support Prospecting Australia:

This site may earn a commission from merchant affiliate links, including eBay, Amazon, and others.
Is there a formula for the size of the pipes in the fluid bed sluices , please ?

Eg ; length of the pipes, their diameter ,amount of pipes ( all based on the internal water volume of the sluice) and the size of the holes or amount of holes required per pipe ?

Do you position the pipes about an inch from the bottom of the sluice and an inch apart ? Shut me down if i ask too many questions !!!!

Thanks.
 
Just Starting

Ok here are measurements. first of you don't have to be mm accurate. these measurements are what mine ended up as. you should however keep the proportions close. Materials were 2mm aluminium plate for bottom of both the top chamber and the bottom chamber including capture box and top discharge plate, 50mmX50mm aluminium angle 3-4mm thick I think from Bunnings. I got the deck plates from a metal place as offcuts. The punch plate may be difficult to find. I found mine at a metal recycling dump. you could use grizzly bars as in the original Croc. Other smaller angles from Bunnings to support top plate and discharge plate. The top plate and collection box must be sealed with marine grade flexible water proof corking. The bottom plate and discharge plates need not be sealed. where the tubes project into the lower deck and out of the discharge end plate also must be sealed and the discharge end I capped. At both ends where the tubes project through the walls I sealed the edges with Selleys Knead It Aqua. The collection box end was a bit of 50mm angle. The upper end of the collection box is tricky and must be a really good fit. I used 4mm thick offcut of aluminium I had handy. I also used 2mm plate offcuts to cover gaps between top and lower decks over the collection box area. make sure everything is smoothly sealed in the box. everything was riveted and in the collection box and top plate I plugged and sealed the rivets. Pictures would help but I cannot make them work on the forum. DM your email and I will send some and maybe you could post them for me.
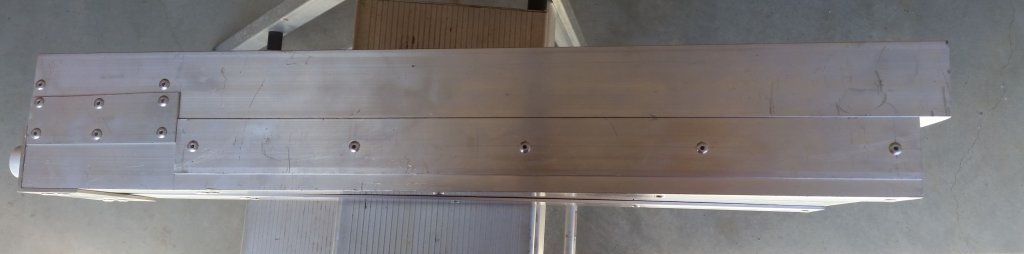
Overall dimensions

Width at flare 255m
width at discharge 120mm
Height 100mm each deck 50mm high
top plate length 440mm
bottom plate length 630mm
top plate overlaps bottom plate at flare by 20mm. The top plate is shorter as it ends just after the collection box starts. it must extend beyond where the collection box upper end wall starts so it acts like a riffle when material enters the box.
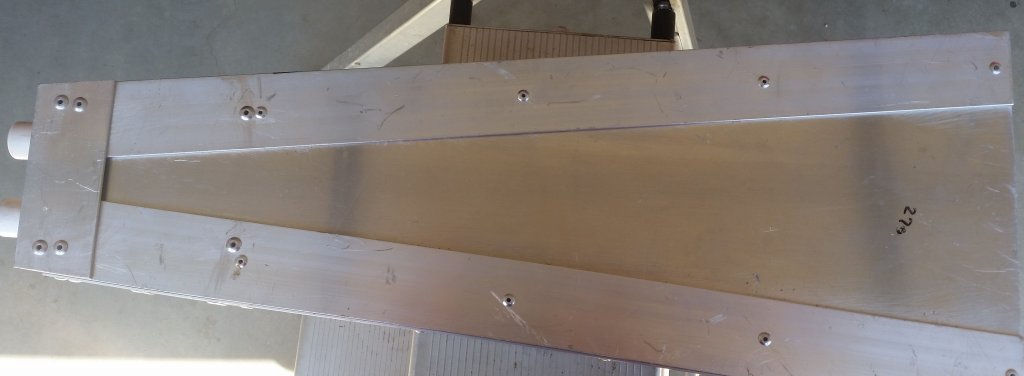
Top discharge plate

width at feed end 135mm
width at discharge 110mm
length 120mm
distance from top plate below sidewall 18-20mm
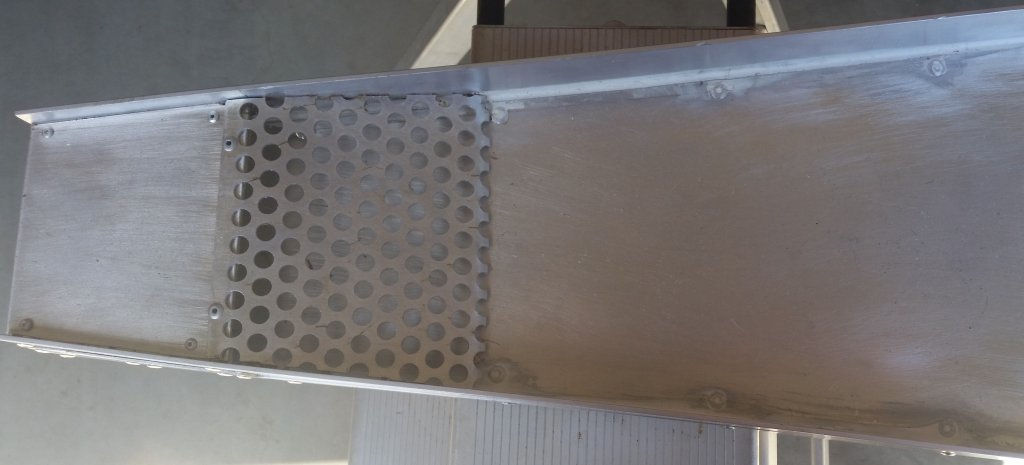
Screen

width at upper end 165mm
width at lower end 135mm
length 140mm
hole sizes 10mm
if you are using punch plate cut the holes through the middle horizontally where it sits on the top plate and steepen the angle of the punch plate there a little just at the last half holes so material can go through.
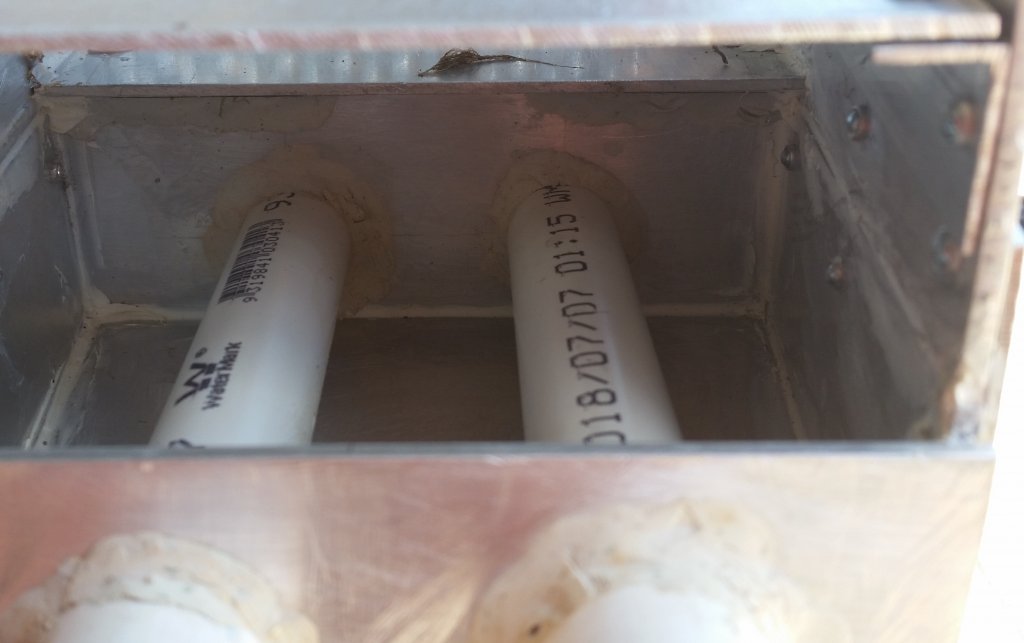
Tubes

diameter 20mm
holes 3/16 every 20mm, 5 on one side and 4 on the other alternating. these holes face down and to the side. not straight down or horizontal. the idea is to keep the material agitated to help the flow coming from the top plate.
length of tubes 150mm or so. they must protrude into the lower deck around 10mm or so so any material that does go into the chamber does not enter and block the tube holes.
height of tubes above box base 3-4mm
collection box discharge wall height 50mm

Also remember when you first use it you absolutely must charge the collection box. run several scoops of gravel through so you end up with a layer of material in the bottom of the chamber, preferably do not use pay dirt as you will blow any gold right out until the box is charged. when you stop running the sluice or at least when the water going through it stops you must empty it as the material in the box will settle.

hope this ill be a start. remember alway measure twice and cut once. the whole thing can be done with hacksaw, metal cutting blade of jig saw, files, rivet gun and various size rivets, drill and metal cutting hole bits for the tube walls.

Araluen
 
Thankyou so much Araluen.

You have gone to alot of trouble and i appreciate that.

Unfortunately i can`t send PM`s until i reach 10 posts, but with all that info , i will print it off , start drawing a diagram and work out what i need to buy .

When i have finished it , i will try to post pics of the result.

Thanks again and have a safe and happy new year.

JS
 
Here are the photos Swright sent me of his sluice.Looks the goods mate.
1546397500_9ace0b14-38e0-4b06-8e61-8e83f3048a6d.jpg

1546397594_e17e9ef7-4b1a-43d0-b74b-27bc5957a669.jpg
 
Thanks Mate I hope everyone can get the idea and along with the specs could copy it. If anyone has any more questions get back to me.

Araluen
 
casper said:
SWright said:
Thanks Mate I hope everyone can get the idea and along with the specs could copy it. If anyone has any more questions get back to me.

Araluen

I have one..... are the pipes capped where they exit the collection box? a photo from that angle would be great ;)

casper (aka Rob)
In post #50,they look like they are capped.My guess is they would have to be capped or the water would just flow straight through the sluice and not out the holes in the tubes in the collection box which causes the agitation.
 
Yes the pipes are capped and sealed where they exit the collection box. You could end them against the inside of the box but for me it was easier to drill through both inlet and exit walls. You have to be careful in what order you assemble the sluice so as not to make it all
but impossible to seal the box correctly. The tubes were second last to go in after the box was sealed and so it was easier to drill through the end box. next the top plate of the sluice was put on and sealed then the small plate on the top of the box. and finally the punch plate and side strips to seal off both decks.

Araluen
 
Thanks for the pics Araluen and thanks for putting them up Eldorado.
Doesn`t look that hard or complicated to do ,but obviously there will be a lot of measuring and cutting and sealing.

You have done a great job of it and those pics are a real help. When the weather cools down abit and my workload eases , i`ll get into it
I`d love to weld up one from sheetmetal ,but i reckon it would be too heavy.

Cheers.

JS
 
SWright said:
Yes the pipes are capped and sealed where they exit the collection box. You could end them against the inside of the box but for me it was easier to drill through both inlet and exit walls. You have to be careful in what order you assemble the sluice so as not to make it all
but impossible to seal the box correctly. The tubes were second last to go in after the box was sealed and so it was easier to drill through the end box. next the top plate of the sluice was put on and sealed then the small plate on the top of the box. and finally the punch plate and side strips to seal off both decks.

Araluen

Thanks for clarifying - can't wait to commence my build.

casper
 
Bump

Looks like croc gold traps are no longer making their fluid base sluices and the guy that runs the US based green mountain gold trap sluice doesnt ship outside the US ..
So the only option is making them our selves.
 
I made one out of old particle board I had laying around in which I used once. Once I get some decent flowing water where I go I will have to drag it back out and give it another run. Think mine needed a few tweaks to get it running a bit better.
 
I copied down the specs in this thread posted by SWright and thinking about trying to put one together.
Aluminum would be the obviouse choice to work with but some I have seen on the net and commercial ones from the states(green mountain sluices) are made from clear perspex or plastic . The green mountain sluices also have a removable fluid trap for easy cleaning with out the need to take the sluice out of the water.. both features would be handy.
 
G'day Bryan

I found that making it out of aluminium is good because it sits in the water very nicely. the plastic ones need to be wedged in to stop them floating away. as for cleaning it its as simple as just upending it, trap area down, in a bucket. two quick twists and its done. those removable boxes tend to jam with fine silt and clay.

Steve
 

Latest posts

Top